Quests: Estate Planning, The Young Lady Vanishes, Tendering an Offer, Family Ties, Koss Goes Recruiting OR Melonni Goes Recruiting, Fish in a Barrel
OK, since all of you will need to level your new friend after you get them, come back to this paragraph after you acquire your new friend. The info for your primaries is in the first paragraph
of their story missions (i.e., Rilohn Refuge for MoW's stuff and Pogahn Passage for Margrid). Map to Pogahn Passage (Magrid people will already be here)
and find the portal to Arkjok Ward (the NW portal) and talk to Kahan who's right beside it. He's got a quest for you that... wait, what? Zudash, that cranky Sunspear-blackmailing guy in Yohlon
is Koss' dad?? Whaaaaaat. Well, grab his quest, then map to Kodonur and go out into Jahai Bluffs. Head NW then left when the path opens up and follow the wall. When it starts turning SW slow
down, as there's a village of sorts right below the hill you're on. Inch forward and soon some Kournan guards will start talking. Their dialogue won't show up in the chat at all so if you want
to hear them talking about The Hunger, some "missing recruits" (or food for The Hunger amirite), and Kormir being captured you'll have to angle your viewing angle down. After Dunkoro says "Back
to the base!" a Kournan patrol shows up behind you so be prepared. Map back to Kodonur, add Koss to your party and go south into the Dejarin Estate. Head to the nearby shrine, grab the Kournan
bounty, then go straight south to where one of the cells was during the Kodonur mission. Be careful as there are several patrols that wander around this cell, so don't just go straight for the
cell. After the area is clear go up to the centaurs, who say that since you've freed them and rescued Mirza they will help you fight Varesh. Now head west to where the double cells were during
the mission, then turn south and follow the path past the res shrine on your left. When the path splits go left along the beach til you reach another res shrine. Kwaju is just north of the
shrine (be sure to grab the heket bounty too). This quest involves scouting several places around the estate. In reality, after you talk to him he just runs off on his own and will not aggro
anything, so just let him update the quest on his own. Backtrack along the beach through the stone arch and take an immediate left after going through it, then left again once you're in the water.
Head east towards Camp Hojanu past the random mob of NPCs and make sure you take out all of the patrolling heket between the NPCs and Camp Hojanu. Once you pass the shrine just outside the portal
turn around and head back to the stone arch. From here go west towards Pogahn Passage. Just past the res shrine, right before the portal, is an NPC named Hogun the Unpredictable. He claims his
fiancee has been kidnapped by some rival corsairs and begs you to help him get her back. Backtrack again to where the random NPCs were. When you approach, the corsairs seem to recognise Hogun,
but not in the way we've been expecting... Koss realises that this is actually his sister, the one that Zudash said he'd paid some corsairs to get her out of Kourna. Once Ailonseh tells you to
watch out, all of the corsairs turn hostile, however they're cake so no worries. After they are all dead, talk to her again and she asks you to take her to Camp Hojanu. This is why we cleared
the way before getting the quest, cause she's pretty squishy and her dying means failed quest. Lead her to Camp Hojanu. You can stop once she reaches the starburst and the quest updates. Make
sure your Estate Planning quest also says Completed next to it in the quest log and map to Pogahn Passage. Talk to Behchu for your reward and his next quest. Talk to Vadah, who's nearby, then
map to Kodonur and go back into the Estate. Head to where the double cells were during the Kodonur mission (remember to grab the Kournan bounty). When you approach, Palmor siccs her friends on
you, but they're pretty easy. Once they are all dead and Palmor surrenders, talk to her and she says that if you get rid of some of the guards she'll sell back part of the land. The guards are
just south of here and are also a normal mob of Kournans but there are two more groups between us and them so take each mob one at a time. Once the target mob is dead map to Yohlon Haven and
hand in two quests to Zudash, and acquire his next quest. Go out into Arkjok Ward and go right through some bugs and mandragors to find Ailonseh in a tiny little village. Talk to her and she
gives you a letter to her father. Map back to Yohlon and give Zudash the letter to get your reward for this quest and also the overarching The Dejarin Estate quest. Map to the Sanctuary and
turn in your two quests to Lonai. Enter the Command Post and grab one of Dunkoro's two quests (you can only do either Koss Goes Recruiting or Melonni Goes Recruiting, not both), then talk to
whichever ally you chose. Also, if you acquired Margrid as a new friend she will also be here in the Command Post and has a quest for you. Our new friends should be lv 20 by now, so skip down
to whatever story mission you're supposed to do (Rilohn for MoW, Pogahn for Margrid), to the paragraph just after the pre-mission screenies.


Quests: To Kill a Demon (primary, MoW split)
Required hero: Master of Whispers, MoW-MoW-MoW'ing his boat down the Elon
So, primary time. Map to Kodonur and go out into the Dejarin Estate. MoW and his very shiney friends are just ahead near the res shrine. Heads up here, as this quest involves killing waves of
evil things that do not leave corpses so if you're using an mm go back into town and switch them out. You will need lots of healing and protection skills for this quest so make sure you bring
them, whether they are ritualist or monk skills. Talk to Dehjah, then make your way back to the res shrine. Three mobs of droughtlings spawn in rather quick succession as soon as the conversation
ends and they all head towards where you were just standing by Dehjah. Don't worry about the NPCs as the droughtlings will not attack them. The third group of droughtlings spawns just south of
the shrine, so as soon as they spawn move south to intercept them. All of the droughtlings are earth eles so taking one mob out without aggroing the other two helps a lot. When you're ready,
attack the other two mobs. Once they are all dead, talk to MoW who tells you that as long as you stay on the right path he will be by your side. He also informs you that in order to kill the
Drought (the demon in the next mission) we must first weaken him before it destroys Istan. Map back to Kodonur then go out the NE portal into the Floodplain of Mahnkelon (and yes, we are going
to be fighting more droughtlings but there's other stuff between us and them so you can put your mm back in your party if you want). Find MoW by the shrine up ahead (be sure to grab the bounty
as we'll be fighting a lot of frogs) then head NE. The first group of droughtlings is just past Dehjah, who's just chilling on a hill. The next group is just east of that, and the next is just
south of there. Next, go SE a bit for the fourth group. The last group is east of there, however be aware that there's two mobs of skale patrolling around there, with blighters in each, so make
sure you take them out before aggroing the droughtlings. Once the last group is dead, go find Dehjah on her hill to the NW. Once you load in Rilohn Refuge talk to a now non-shiney Dehjah to have
MoW permanently join your party. Go back to the first paragraph on this page so we can level him.
Mission map here.
Alright. For this mission you MUST take the skill Winter with you, ESPECIALLY if you want to do the bonus. Winter is a Wilderness Survival ranger spirit, however you don't need to take an actual
ranger with you. Just have someone (or you, or one of your heroes) change their secondary to ranger and bring the spirit. You will only need it for the final boss if you're doing the bonus,
but the rest of you might want it for the droughtling mobs you'll encounter. Also even something as small as rank 2-3 in Wilderness Survival keeps it alive long enough
to murder whatever you are using it for. Put MoW in your party as he's required, then talk to Dehjah to enter the mission. OK, here's
the thing about this first part: Dehjah can die. Also, she seems to somehow be related to Prince Rurik, cause she will just banzai onwards to the next mob of enemies literally as soon as the
last one falls in the mob you're currently fighting. And yes, if she dies you have to restart the mission. ^=__=^;; So basically just leave your loot alone until you get to the entrance to the
fort, cause that's when she stops following you. Go forward towards Dehjah and MoW starts monologuing. Dehjah tends to run off before her first line of dialogue so keep an eye on her. Also,
if you aggro a mob and she's not in their aggro bubble she will just keep running so be sure to follow her. After a couple of mobs of drakes and Kournans you reach the entrance to the fort, at
which point Dehjah stops following you and gives you some advise on the Drought. Here's the thing though: the bonus is not turning off any pumps. This means that the Drought will be at full
strength if you do the bonus. Basically there's an area effect on the fort that causes you to take 50% more damage from earth magic, however with each pump you turn off the percentage is reduced
by 10% and you get a morale boost for each one. Also, Winter causes all elemental magic to become cold damage so if you use Winter this area effect is irrelevant, no matter how many pumps are
left on. Yays~ OK, so in order to make this less complicated for all of you, check out your minimap. There's a series of red flags in the shape of a V. The point of the V is
where the final boss is. Besides a few sets of stairs going off to the side it's basically a straight shot from here to the final boss. So we'll meet those of you doing the bonus at the gates
right outside where the Drought is (one of the Agents of Whispers will tell you when you get there, so stop at that guy and we'll meet you there after the next paragraph). Just remember not to
turn off any pumps if you're doing the bonus.
So for those of you not doing the bonus, head through the now-open gate and go left to take out some Kournans. Just north of them is a group of three droughtlings. Depending on how strong your
party is you might want to drop Winter before engaging any group of droughtlings because of the aforementioned buff. Generally though the droughtlings aren't really that difficult so it's up to
you. Just remember to drop it out of the way so it doesn't end up dying from some attack. You will need to kill them first in order to turn off the pump. Once they are dead, turn off the nearby
pump then head straight SE, take out the mob in the water on your left, and continue SE some more to find the next pump. Take out the mob of Kournans, then the mob of droughtlings, then turn off
the pump here and go back to where the mob in the water was. Some Agent of Whispers guy tries to prevent you from going forward, but MoW is like, step aside bitch. He opens the gate to the NE,
so head on through then take a right up a bunch of stairs. Continue east and take out the Kournans and droughtlings, then turn off the nearby pump. Head NW for the next pump then backtrack SE and
take the first left. Another Agent of Whispers lies ahead, and tells you the Drought is just beyond these doors. Time to meet back up with our bonus-completing friends.
Alright, now that we're all back together, take a left from the Agent and go through the gate. Seems the Drought knows you're here. Well, as you can see, the Drought isn't alone. However, they
are several separate mobs and none of them are in a mob with the Drought cept the ones right on top of him. Drop Winter here by the gate then go NE to find some stairs on your right. Pull each
mob up here one at a time and kill them up here. Once all of the droughtlings on this side are dead, go back to where the Agent was (he's moved since then) and go up the stairs and through the
gate on the other side. Do the same thing with the mob on this side. Now, go down into the water. For those of you NOT doing the bonus, there's one last pump down here by the waterfall on the
opposite side from where the Drought is. If you are doing the bonus, don't touch the pump. Drop Winter about half an aggro bubble away from the last pump and attack the boss mob. Take out the
Droughtlings first as they are annoying, then kill The Drought. Afterwards, you hear a wail in the distance. MoW opens up a secret passage that "an old corsair friend" told him about (probably
Margrid), and you all make your escape. Meanwhile, The Hunger and Bayel's relationship is having some growing pains...

Quests: No Me, No Kormir (primary, Margrid split)
Required hero: Margrid the Sly, Sneakiest of the Corsairs
So, primary time. Map to Yohlon and head out into the Marga Coast. Margrid is right next to the res shrine just in front of you. Talk to her, then go west, then SW to the beach. Head west
along the coast through the boss mob (be careful as there's a popup of three frigid skales (water eles) right before the boss mob). Unlucky Simon is just around the bend, however there are three
patrols of skales coming at you from different directions, including another boss mob, so wait and take them out before you talk to Simon. He says that some of his crew doublecrossed him and
stole the map. Well, this beach is infested with popups so head north from Simon, then go left once you leave the beach. Continue west past the fort on your right and some more beach on your
left. Once you pass this last bit of beach go left up a path (there's a popup of insects about halfway up this path). You'll find Shifty Lem and his fellow traitors at the end of the path.
They turn hostile almost as soon as Margrid starts talking so be prepared to take them out. Once all of Lem's friends are dead, talk to him and, after many excuses, he hands you the map. Give
it to Margrid to get your reward, and says that if you let her have some of the loot from here on out she'll stick around. Map to Pogahn Passage, find the Jack of Truths near the NE portal (to
the Dejarin Estate) and talk to him for him to say that you need a disguise. He sends you off to kill some nearby Kournan guards and steal their clothes. Like, how many times are we gonna have
to wear somebody else's nasty clothes in this campaign? At least they're not corsairs this time. ^<__<^;; Go south through the portal into Gandara (you might want to find the sign next to the
portal and click-spacebar it, otherwise it can be a bit annoying getting to this portal). Outside go left across a wood plank bridge and then a proper bridge to find the Kournan patrol. They're
just regular Kournan soldiers so they don't put up much of a fight. Afterwards, click on the "Sets of Kournan Armour" thing just south of where the patrol was and put on the armour. After the
cinematic, talk to Jack again to have Margrid permanently join your party. Alright, go back to the first paragraph on this page so we can level Margrid.

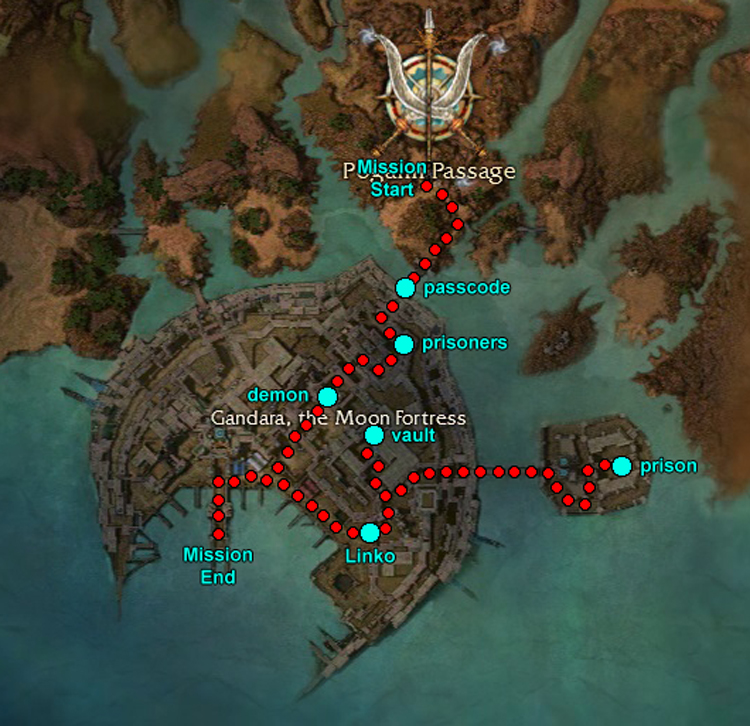
Mission map here.
So, you don't have to take Zhed with you but you get more dialogue with you do and it's kinda funny. :op Dear Zhed: You are not Chewbacca, stop it. :op OK, one quick thing about this mission:
the bonus requires you to complete five bonus objectives, but 4/5 of them are on the way to the prison anyway so you might want to just get the mission done anyway. It's super super-easy.
Anyway, when you're ready talk to Jack
of Truths to enter the mission. Go SE then make an immediate right before the bridge. Talk to the Guard Captain to get the passcode: 20, 1, 8, 7. Enter the fort and cross the bridge, then go
left to find a guy named Captain Nahnkos. Talk to him to acquire some recent Sunspear prisoners. Head SW, right, up some stairs, and left through a gate. Up ahead you'll find a hostile demon.
Inch closer and it starts attacking the Kournans. Technically as long as someone wins this fight (either the demon or the Kournans) it counts for the bonus, but if you just leave them alone it
will take for bloody ever so just go kill the demon, as much as I hate helping Kournans. From here, head straight SW past the giant glowing purple doom on your left (yeah, this is where Varesh
summoned all those demons during the Consulate Docks mission). Eventually you'll reach the water and a bunch of ships. Once you do, go left and you'll soon come across Guard Linko where the
gate we blasted to bits was in the Cons Docks mission. Tell him you'll take over his shift, then abandon your new duties and go through the gate and up the stairs to the left. Continue up the
second set of stairs to the NW then go left from the Kournan and Vabbi guard standing by a palm tree. After the stairs head right to find the vault. Margrid cons the vault master and acquires
the diadem. Backtrack past the Kournan/Vabbi guard down the stairs, then go left and up some other stairs to find Prison Keeper Shelkesh. Give him the password to be allowed into the prison.
OK, here's the thing, guys. As soon as we spring Kormir (and the cinematics end) a 15min timer begins to count down. Now, 15min seems like a lot of time, however in case you haven't noticed
this place is kinda maze-like. Also, as mentioned before if Kormir (or the other escort NPC we're about to meet) dies, it's mission failed. So after you talk to Shelkesh open your minimap. The
red dots from here going west then south then east again is the path we're going to take after rescuing Kormir. We're going to go back along that path following the water past the flag called
Port of Gandara, then take a left down the dock to the red lightning bolt labelled Escape Point. Seems straightforward now but there will be lots of Kournan mobs between us and this point when
the counter begins. Also, remember the staircases we passed coming up to the prison keeper? We will be stopping at the top of each to pull mobs up them to us to make things easier. These stairs
are the hairiest part of this mission so I want you to be aware where these spots are before we continue. If you're doing this as the sole thinking member of your party, you can use Ctrl+Shift+Space
to call targets without attacking them yourself, and if Margrid is still using a bow she can pull for you. Alright, now to free Kormir! Go across the bridge then take a right, then left through
a gate, then right through another gate and down some steps. Backtrack across the bridge but stop around 3/4 of the way across. There's a group with a boss running towards you. After they're dead,
continue to the top of the first set of stairs and wait. A giant mob is coming towards you. Kill them from the top of the stairs. If you have minions they will probably aggro the smaller next
group. If not, lure them to the stairs. Continue to the gate and Linko has returned to his post. Take him and his cronies out, then start making your way down the water's edge (there's another
boss just past Linko). If you don't banzai, the guards lining the water's edge path should come only one or two at a time. You should be able to sneak past the group just up the stairs right
where the path turns west. Be very very careful as you approach the dock as there's an ele boss who can deal some serious damage to your escort NPCs. If you have minions with you he'll probably
be too distracted hitting them after you aggro the guards on the dock so as soon as his attention is elsewhere, HIT HIM WITH ALL YOU'VE GOT. Ba-bam! Once you reach the end of the dock the mission
ends. Kormir says that you need to press on to Vabbi, and tells you about the same passage that the MoW-friends went through in the Rilohn Refuge mission. Shahai, Margrid's sister, says she'll
take care of Kormir while you head to Vabbi with Margrid. Meanwhile, The Hunger and Bayel's relationship is having some growing pains...


Quests: Undead Defenders, A Thorn in Varesh's Side, Old Woman River, Drakes on the Plain. Mirza's Last Stand, A Bushel of Trouble, Troubled Lands, Ancestral Anguish, You
Can Run..., A Message for Janeera
Alright, so this next mission takes us out of Kourna, so before we do that let's get our outstanding quests done. Yeah, we have a few new friends coming up but not for awhile. Head to Ronjok,
and Chuno and the herdsmen from the previous quests are arguing with Elder Jonah, saying that everything is still our fault. Hey, we saved your herds and stuff! What's your problem? Jonah says
that Varesh would've attacked them eventually anyway, and after the conversation ends you can get a new quest from him (*Note: You can only get this quest if you've reached Moddok
Crevice, done the Herds to the Slaughter quest, and done at least 2/3 of Chuno's quests involving Toma (i.e., you don't need to have done Insatiable Appetite)). Once you take the quest
Kournans start coming in from the three gates to Ronjok. Just park yourself just in front of Jonah and kill all of the Kournans~ When they show up they are non-hostile green triangles but they'll
soon aggro after they threaten to destroy the town for not meeting their quotas. Just stay where you are and let the mobs come to you. Jonah starts summoning minions to help out so they will
distract the mobs from overwhelming you. This quest is pretty easy. Once they are all dead talk to Jonah for your reward. Next, map to Pogahn and go out into Gandara, then go SW til you reach
the water. From here head straight west past a res shrine and over a bridge. Soon you'll see a village in the distance, and Nerashi on your left. Before you talk to her, kill off all of the
Kournans in the immediate area. Make sure everyone's energy is refilled, then talk to her. She says that Morgahn (that other general of Varesh's who isn't Bayel that we've only seen like once
so far, unless you're a NF char in which case you'll remember him from like forever ago right outside the Astralarium) is leading troops north through Jahai into Vabbi and that it'd be better for
us to kill them now rather than later. Kill off any mobs that show up, and Nerashi says that we need to fall back. A giant mob of Kournans
starts heading your way. Look, the quest wants you to run but they do start wandering towards the next starburst and there's an ambush waiting for you there, so it'd be smarter to kill these guys
in case you need to retreat later. The large mob is difficult but they are not impossible to kill. If you have minions you can get the minions to aggro, then run towards the next starburst but
stop about halfway there, then come back and take out the scribes and priests while they're distracted by the minions, then finish off the others at your leisure. Be aware that they have two
scribes and two priests. After they're dead Nerashi is impressed but insists that we have to leave NOW. You actually have plenty of time so don't forget whatever loot's been dropped for you,
then make your way back east towards the starburst. Make sure everyone's energy is full before reaching the bridge, then make your stand in the middle of the bridge. There are three mobs again,
so just let them come to you. After they're dead another large mob shows up from the fort on your right. There are no more ambushes waiting for you so if you don't want to fight this mob you can
just run off to the next starburst. If you're going to attack them they also have two scribes and two priests so employ the same tactics as last time. Once you reach the last starburst you can
get your quest reward from Nerashi.
Now we'll do those recruiting quests. First up are the guys who chose Koss Goes Recruiting. Map to Camp Hojanu and put Koss in your party, then go out into Barbarous Shore.
Head straight south and you'll soon reach Hasahk the Clever. He says he'll help out if you get rid of some corsairs for him. As soon as you talk to him some corsairs start approaching behind
you. It's a small group so they shouldn't pose any trouble. Once they are dead, map back to the Sanctuary to get your reward from Lonai. Next up is Melonni Goes Recruiting.
This one is a little longer but not much harder. Go to the Sanctuary and add Melonni to your party, then go through the Command Post out into Sunward Marches. Head straight west to the coast
til you reach the water. Just NW of that is Jehrono, almost smack-dab in the middle of a boss mob. After the mob is dead, talk to him, then map back to the Sanctuary and get your reward from
Lonai. Map to Kodonur and go out into the Floodplains. Head NE to the water then go left til you find Turlon. Run to him cause a giant mob of heket is heading right for him (and there's another
one on your right that you'll probably aggro as well). Just keep him alive; they're just heket so they're not that difficult, just keep them away from Turlon. If you have Zhed with you he comments
that the land here has changed. Speak to Turlon, who says Varesh and Bayel were just here. This is enough to finish this quest, however if you did the Rilohn Refuge mission we have one more thing
to do here (if you didn't do Rilohn Refuge go north from Turlon and enter the Rilohn Refuge outpost. There's a quest here that we're about to do so we'll meet you there~). Head east, then go
left, then left again to the front of the fort. Some guy starts running around and freaking out. Once he stops screaming, talk to him to get a quest about some ghost or another (she was actually
here while he was screaming but she did nothing and said nothing so you might not have even noticed her). Map to the Sanctuary, grab your reward from Lonai, then map to Rilohn
Refuge. Those of you waiting here listen up too. Find the NPC named Mahzu and grab his quest. Apparently some friend of Koss' has gotten himself into some sort of jam. Put Koss in your
party and go out into the Floodplains again. (The ghost from the Old Woman River won't spawn til you hand in the Weird Waters quest, which is why we zoned). Those of you with the
Old Woman River quest, ignore Wehkesa and head south. You'll soon find some weird shiney guy named Yartu who wants you to kill some Kournans. Well, we're always up for kicking some Kournan butt,
amirite? Make your way towards the Kodonur portal and you'll soon find the Kournans Mr. Shiney wants us to kill. There are five mobs but if you pull carefully you'll only end up fighting one mob
at a time. There are a ton of scribes here though so just be careful. Try not to aggro the boss mob when fighting the last mob (the one to the SE) or you might end up with some trouble. Once
they are dead return to Mr. Shiney for your reward, then return to the portal to Rilohn where Koss' friend awaits. Talk to Wekehsa, who immediately starts running off.
This is another escort quest so keep up with him. There are suddenly random drakes all over the bloody place. The first few mobs are just lv 10-20 irontooth drakes, but soon you'll start seeing
elementalist drakes, which can kill Wekehsa pretty quickly if you don't aggro them first, especially the sand drakes (since this idiot is melee). After a lot of running around, you eventually
reach the end of the map and find... of course. The original owner of the scythe. gg stupid idiot friend of stupid idiot Koss. As soon as he finishes his speech, Yama and his guards turn hostile,
but they're really not difficult at all. Once they are dead, talk to Wekehsa for your reward... and the rubbish scythe. Great.
Next, put Zhed in your party and head out into Turai's Procession via the Command Post (You will need a minion master for this quest chain, otherwise you are going to hate life).
Go east, then head north at the weird psuedo rock village thing, then go NW when the path splits. Once you reach what looks like... a boat stuck in a tree? coming up on your right, turn left.
You'll soon find Mirza. Speak to him to get your quest reward. Now, for some reason the game doesn't quite realise that you finished this quest so we're gonna have to rezone before we can
continue. ^=__=^;; gg Anet. So go back to town then make your way back here to Mirza. This time you'll see a bunch of Kournan and centaur NPCs before reaching Mirza. Before speaking to him
go activate the res shrine south of him. You have plenty of time to run to the shrine, activate it, then run back to Mirza before the conversation is over. Once the NPCs are done talking, the
Kournans become hostile. STAY PARKED ON TOP OF MIRZA. He moves a little bit, but being a paragon he's a ranged attacker so he won't move too much. Just stay on top of him and let the mobs come
to you. The other centaur NPCs are irrelevant and will serve to keep the mobs staggered so you don't become overwhelmed. The boss mob and the giant mob that comes from the opposite side from
the boss mob are the last two mobs. If you do end up wiping run back quickly from the res shrine we just activated cause Mirza dying means quest failed. After all the Kournans are dead, speak
to Mirza to get the quest we just finished (i.e., killing the Kournans), so speak to him again to get your reward. Mirzaaaaaa, if the Kournans stink of evil why are you eating them. That sounds
unsanitary. He decides to make you part of the centaur pride, and gives you a new quest. He says the land itself is being corrupted and that he needs you to collect information from one of their
scouts. Map to Venta Cemetary and go out into Sunward Marches. Yera Swiftsight is just beyond the gate here, on your left. He sends you off to poke some nearby shrubbery. ... Yera, are you
secretly a Knight of Ni? The first shrubbery is just SW of here. Once you poke the shrub some evil plants spawn like right on top of you. Continue NW to get to the next evil shrubbery of DOOM.
... or, not so evil. Heyyy... maybe that guy isn't such a good scout. Next target is straight SE of here. Hum, I may have spoken too soon. The next one is west, just behind this mountain/hill
thing, and is also not evil. Continue south to find the next evil shrub, then north to find a non-evil one. Even more north is another evil one, and west is another harmless one. Continue further
west for more plants of DOOM, and south for another DOOM-flavoured one. Map back to Venta and go report your findings to Mirza to get your reward and your next quest. Mirza informs you that the
corruption has spread beyond Sunward Marches. He tasks you with finding the source of the corruption and purifying it with a sacred seed, which he drops on the ground at his feet. Note that anyone
carrying this thing will not be able to attack physically so you might want to drop it before aggroing anything. Head north, then east when the path splits. There are random elementals in this
area here, just wandering around. Find and kill them, then drop the seed on their corpses. These things will keep spawning in this area, but not always right where the last one died, so just
run around this area here near this giant rock in the middle until you kill and purify ten of these things (although sometimes the game doesn't know how to count, especially if there's more than
one human person in your party). While they look like those evil earth ele stone shard crag things they are actually warriors so don't worry too much about them. Once you kill ten of them, a
boss version shows up but it's not more difficult. Kill it and purify it, then return to Mirza for your reward. If your counter is off you're going to have to rezone and start over, because as
long as someone in your party has a counter that reached 0 the regular tormented lands will stop spawning. Thanks, Anet ^=__=^;; (don't forget to re-acquire the seed if you do). Mirza's next
quest is a Masters difficulty quest, but it is also the last quest we can acquire in this quest chain for now (yeah, we'll be coming back here later). You actually don't need the roots for this
quest, and you certainly don't need the seed so leave them behind. Backtrack towards Venta to find the first mob. Before you aggro make sure there are no other enemies near the corrupted flowers
so you have less of a headache. After the flowers are dead some bugs will spawn right on top of them so be ready. The next mob is clear across the area to the east, past the pseudo rock village
from before. Again bugs will spawn after the flowers are dead. The last mob is to the north. Once they are dead, return to Mirza for your reward.
This last bit is only relevant to those of you who got Margrid as your new friend, so the rest of you click on the next link to get on with the next co-op mission. Put Margrid in your party and
map to the Sanctuary, then go out into the Sunward Marches via the Command Post. Jerob is literally two feet away. Talk to him and... what, shrubbery again? Monty Python strikes again. ^@__@^;;
Anyway, head mostly north and you'll soon find the Kournans. Who... are expecting us. Thanks for the double-cross, Jerob. There are two scribes so deal with them first. After they're dead, map
back to the Sanctuary and get your reward from Lonai, then go into the Command Post. Margrid has a new quest for you: namely taking revenge upon that douchey double-crosser. Map to Camp Hojanu
and head out into the Barbarous Shore. Go straight SE then go right when you reach the water, then an immediate left at a round rock that you pass on your left. Go right along the shore and you'll
soon find Ruthless Sevad. Talk to him about Jerod, then grab the quest he offers. What's his deal with herbalists anyway... Map to Yohlon and find Herbalist Makala by storage. Seems he doesn't
know where Jerob is. Map to the Sanctuary and go out into Arkjok Ward. Head straight east past the LB (lightbringer) shrine, then go left around the hill just ahead. Kill the Kournans who are
apparently robbing the herbalist. Hey! He's OUR mark! Hands off our loot. Talk to the herbalist who tells you that... uh. That this medicine is for Ronjok, where some fever is killing the children.
Well, here's the deal guys. Sevad is going to send you to Jonah regardless BUT if you skip going back to Sevad and go directly to Jonah you can't get Sevad's next quest. So! Map back to Camp
Hojanu and go find Sevad in the same place as usual. Sevad isn't happy about the Kournans you killed and sends you off to Jonah with the medicine. HOWEVER, before you map anywhere talk to Sevad
again and take his next quest. He says he'll keep quiet about your location (really? Does everybody know where we're hiding?) if you simply deliver a message for him. Map to the Sanctuary and
go to Ronjok. Janeera is just to your right, near Toma and Chuno. After giving her the message, talk to Jonah to give him the supplies. ... does... does he have bipolar disorder? He's like "YOU'RE
LATE, YOU SUCK, STOP WASTING MY TIME" one minute, and the next is like "YOU'RE AWESOME." Whatever Jonah. Maybe there's a reason you're called "Elder." *makes "he's crazy" motions by her head*
Now, go find Sevad again to turn in your message quest and we're finally done here. No, I don't know why Anet decided there should be like 50,000 quests that only half of you can do (i.e., those
of you who chose Margrid), but at least we're finally done. Maybe MoW is too busy keeping secrets to give out quests. Well, whatever. Time for the next mission!
Invasion of the Party Crashers
Corsair Infestation
Those Bird-Things Aren't the Only Harpies Around Here
It's Getting Kinda Crowded In Here
And Then the Men Go Marching Out Into the Fray...
Boldly Going to Strange New Lands
On the Run
Me and What Army? CENTAUR ARMY, THAT'S WHAT


