
Quests: Sands of Souls (primary), Ancient Secrets
I'd like to point out here that, unless you cheated in whatever way, the desert (specifically the desert missions) are the first places in Prophecies where
you can capture elite skills. Not only does that FINALLY complete that quest Magi Malaquire gave you about five thousand years ago, but elite skills tend
to be pretty awesome (hence the name). Not all of them will be suited to your play style, but it's worth it to cap(ture) a few anyway. In case you've
forgotten Magi Malaquire's explanation from so long ago, you cap elite skills (they also work on regular skills) by first equipping the Signet of Capture
he gave you into your skill bar, finding a boss of one of your two current professions, killing it, and then using the Signet and choosing a skill from
the menu that pops up. Every boss tends to have a different skill set, and different bosses from here on out may have different elite skills. Also, the
Signet of Capture (or "cap sig") is a one-time use signet (unless you close the skill window without choosing a skill to capture), so you'll need to buy
more if you want to capture more skills.
Alright, there are only two quests here. One is given by Fangfa Tai, and the other by some large see-through dude called Ghostly Hero. Ancient Secrets
is nowhere near here, so we'll get around to it later. Grab some dudes and head out. OK, one note that you should keep in mind for the entire desert:
There are tons of popups EVERYWHERE. Devourer popups (who like to lay down traps) and scarab popups (all-around annoying). Anyway. Go right, left, and
left some more, battling the ten thousand popups to the very back of this area. Here, go right, take out one more popup mob, and then stop. You see this
big white weird thing in front of you? This is a teleporter. There are lots of them strewn about the desert, and they take you to other nearby locations.
Some, like this current one, are the only way to continue. I highly suggest only having one person in the party messing with the teleporters at any given
time, to avoid confusion and time-wasting. If you're with henches, flag them somewhere off the teleporter and step onto it. Do an immediate 180 and face
the four smaller white thingies in front of the teleporter. Watch them carefully, as you need to watch the order they light up in. Don't worry if you
missed it the first time, as when the sequence is over, they all stop for about three seconds and then go through the sequence again (and again and again
until you step out of the ring on the teleporter). Once you've got the sequence memorised (the sequence involves all four lights, but only one flash of
each), go activate each light in the order they flashed in. If you mess up, they all light up and then all go out, so get back in the ring again and watch
the sequence again. Once they all stay lit, you and your party can step back into the teleporter's ring to teleport to the other location.
From here, go southeast. Oh, quick note that hasn't mattered til now but that you should keep in mind whenever you're traipsing about the desert: Hydra.
Hydra are large, evil, cast fire spells, and are MEAN and kill people. >:( So... avoid them whenever possible. *thumbs up* Anyway. Hang a left after you've
gone on for awhile. Take a left when you can, then a right when the path splits. When the path splits again, take another left, and just follow the path
to reach your next destination: Augury Rock.

Quests: Ghostly Vengeance, Into the Unknown, A Belated Betrothal, The Forgotten Ones, Forgotten Wisdom
Skills: Obsidian Flame (Ghostly Vengeance, ele), Mantra of Persistance (Ghostly Vengeance, mes), Blessed Aura (Ghostly Vengeance, monk),
Malaise (Ghostly Vengeance, necro), Dust Trap (Ghostly Vengeance, ranger), Shield Bash (Ghostly Vengeance, war);
Swirling Aura (Into the Unknown, ele), Arcane Conundrum (Into the Unknown, mes), Zealot's Fire (Into the Unknown, monk), Chilblains (Into the Unknown, necro),
Winnowing (Into the Unknown, ranger), "Fear Me!" (Into the Unknown, war);
Mend Condition (A Belated Betrothal, monk), Signet of Agony (A Belated Betrothal, necro);
Vengeance (The Forgotten Ones, monk), Animate Bone Fiend (The Forgotten Ones, necro)
There are two quests here, neither of which are a primary. Well crap. Now, don't get yer knickers in a knot here, I'll tell you what you have to do after
we finish these two easy quests. Ghostly Vengeance (the dude who gives this quest is right by the door you came in through) involves killing 10 minotaurs.
Man, I wish we'd gotten this quest in Amnoon, from all the minos we've killed already. Well anyway, head back into Prophet's Path and follow the path until
you kill off the devourer and scarab just outside. You should see a group of minotaurs coming towards you. Kill them, then zone back inside and repeat
this until you've killed ten of them, as this way is much easier than running about the deadly desert trying to find ten in one go. Grab your reward and
new skills from Marchena, then go out into Skyward Reach for Into the Unknown (the dude who gives this quest is really close to the Skyward Reach exit).
Once outside, you'll find your aforementioned friends, Snarky Cynn, Political Mhenlo, and Impatient Devona. Now, this quest is technically very easy, as
all you really have to do is run to Aidan and map back to Augury for your reward. You don't actually have to wait for Mhenlo and company to get there.
The only problem, however, is that more often than not you can't successfully ninja your way around the like six or so hydra between you and Aidan and like
I said before, they are full of evil and spitefulness. So your best bet really is to walk slightly behind Mhenlo and his merry band of meatshields and let
them aggro the hydra first, at which point you can jump in and help kill the hydra. If one or all of them dies, it doesn't affect the quest in any way, as
long as you yourself make it to Aidan's position. If you've killed off the hydra you can listen to their dialogue if you want. Either way, when you're done
out here, go grab your reward from Jorn back in Augury. Now, on to these trials he and Mhenlo's group were talking about...
OK, so... these trial thingies everyone's on about. If you've been paying attention, you've noticed that most of the NPC's in the desert are ghosts, and
that a lot of them talked about wandering the desert for a bazillion years or something. And also that you've got no primary and thus no nice arrow/starburst
to lead you anywhere. Basically, Anet (the makers of this game) want you to go wander about the desert like these ghosts and hopefully find the trials.
Well screw that. One thing you can do is wait around for some runner to come along and run you to the desert outposts (yes, the three trials of ascension
are missions) for variable amounts of gold (just make sure they take you to ALL the towns, not just mission outposts, cause if you're a Prophecies-born
character, you'll need them for later, and there are six towns/outposts to go to). The other option is to fight there yourself using these maps as guides
(although if you want the extra towns, you'll have to sort of find your own way, although I've shown their locations on the maps I'm about to link to).
Also, these three missions can be done in any order without breaking the game, but the order I've put them in on this page is generally what makes the
most sense, judging by the cinematics. Oh, one slight note when wandering about: WURMS. They can pop up out of the ground in random places, so if you
suddenly fall on your ass for seemingly no reason, a wurm is about to try to eat your head. And one more thing: I tend to ignore most teleporters in the
desert because I find that it takes longer to activate the teleporter than it does to go the long way around. But that's just me. The teleporters will
still be marked on the maps. [
Map to Dunes of Despair] | [
Map to Thirsty River] |
[
Map to Elona Reach]
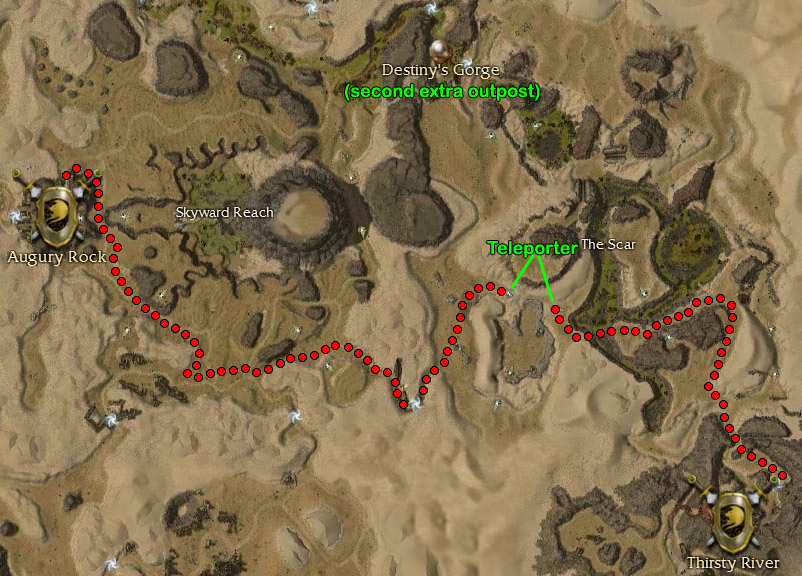
If you go to Seeker's Passage and Destiny's Gorge now, there are only two quests for you, but I'll write them out later. We'll be back here in a couple
of pages when the other quests become available. Tirzah in Seeker's Passage wants you to see if there's any sign left of her long-dead lover, Chebar.
Leave Seeker's and head straight forward (yes, I know the starburst is very close by, but trust me, it's not that easy). Be careful, cause these storm kins
have weird patrol routes and you could get mobbed rather quickly. Once you pass the huge rock on your left, head south. There are also popups around here,
so be aware of that too. When there's an opening to your left, turn there and go down the stairs to the north. Tons of popups in the immediate area, just
so you know. Keep following the stairs (but don't go on the wood itself so you don't end up boxed in. The sandy areas around the stairs provide more
space) and once you reach the teleporter you'll see Chebar's ghost just to the right of it. He gives you the engagement ring he was going to give her all
those years ago. Map back to Seeker's and give the ring to Tirzah to get your reward. Annelle Fipps in Destiny's Gorge has a very important
quest for you. Really. Get it now. Yes yes, I know, you only get some skills from this quest, but this quest is a precursor to another quest that
gets you 15 attribute points. Each level 20 character ends up with 170 attribute points. You're supposed to have 200 however (which you'd know if you ever
tried to make a PvP character), so each campaign has two quests that will give you 15 attribute points each. The quest that follows this one is one of
them, but the quests are campaign-specific, so if you're, say, a Factions-born character you cannot do the Prophecies attribute points quests. Anyway.
Grab Annelle's quest and map to Augury, then exit into Skyward Reach (if you enjoy picking up drops, make sure your bags are empty before leaving, cause
we're gonna be wandering about for awhile). Head right, then take another right as soon as possible (beware the bazillion hydra!). Follow the path and
go left when it does. When the path opens up, head towards your starburst. You'll find a little rocky area and a snakeman. Grab your reward and the next
quest. DO NOT LEAVE WITHOUT GETTING THIS QUEST AAAGGGHHH. Head directly south and follow the path, then follow the branch that
goes east and go through the portal there. Here again the starburst is misleading, so just follow my lead. Follow the path until it opens up, then head
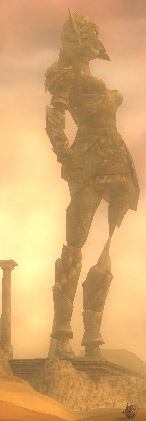
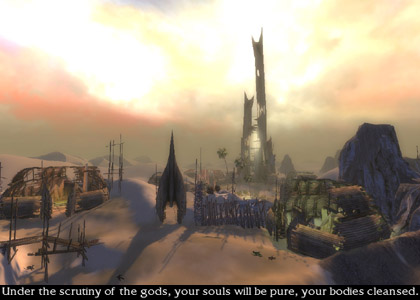
left. Be aware that this is one of those areas that has GIANT WURMS. You should soon be able to see a giant warrior in the distance (pictured right).
Head towards it until it suddenly falls down (you won't actually see it fall down. The image will blink and then suddenly it'll be lying down). Now head
east and follow this path until it opens up, at which point head south. You'll see a giant head and arm sticking out of the sand. When you get to where
the arm is, turn right and pass the ghost. We are now on the platform where the giant warrior statue was. Continue west across the now-fallen statue, then
go a little bit more to the west to finally find the other snakeman. He tells you that the master of the Forgotten (the snake dudes) is some giant crystal
dragon named Glint (shiney name for a shiney dragon). He also gives you those 15 attribute points I was talking about. Woo! Now, let's go do this ascension
thing already.


Recommended level: 19
My current level: me: 19, Acolyte Sousuke (hero): 18, Vekk (hero): 20, Olias (hero): 19, Alesia: 17, Claude: 17
I just wanna make a note for the bonus for this mission. There is one trick to doing it but I hate that trick because out of all of the times I've tried
to do it that way, I've only succeeded once or twice and, considering I have at least 17 characters that have come through this mission, those are pretty
low odds of success. So I'll tell you the way I usually do this bonus further on in this section where it belongs. Here, however, I will tell you the
trick way. I do want to tell you, however, that if you do succeed in getting this trick to even start, it's almost impossible to then go back and finish
the regular mission. Anyway. The trick involves having either a Mo/N or an N/Mo with these two skills in their skill bars: Rebirth (monk protection prayers
spell) and Necrotic Traversal (necromancer death magic spell). They don't actually need to put attribute points in prot or death for this, they just need
to have the skills in their skillbars. Everybody else in the party that isn't this aforementioned person should have a vampiric weapon in their inventory
(not necessarily equipped, unless you always use one, and it doesn't matter what kind of vamp weapon it is (i.e., bow, sword, whatever), as long as it has
the vamp mod on it). Now, once you clear out the inside of the fort except the enemy Ghostly Hero, talk to your Ghostly Hero to make him stay at the
entrance of the fort out of range of the enemy Ghost. Now, go ahead and kill the enemy Ghost to make your running about easier, then go around the walls
of the fort, and really hug the walls here. What you're looking for is a scarab popup on the outside of the fort. You really only need one to pop up, but
more often than not, none pop up at all (which is why I hate this trick). Another option you have if you can't find any scarabs is to go all the way to the
south end of the fort, up on the hill to the left of the southern drawbridge, and use a longbow or flatbow to try to pull the boss group that you can see
from here towards you and kill anything in that group that leaves a corpse. Coincidentally enough, this boss group is one of the three bosses you have to
kill for the bonus, although this one works about as often as the scarab one, since this boss group is rarely close enough to hit even with a bow. Regardless
of whether you pop a scarab or pull the boss group, as soon as you kill something that leaves a corpse, have your Mo/N or N/Mo use Necrotic Traversal to
leave the fort (don't do this until you kill off anything you aggrod if you aggrod multiple targets, so your N/Mo or Mo/N doesn't die). Once your necrotic
traversing party member is safely outside, everybody else in the party should equip their vampiric weapons and DIE. No, seriously. Die. Your party
member outside the fort should use Rebirth to bring each remaining party member outside once they die from the health loss. Now, I know that "teleport to
ally's location"-type skills exist in this game but trust me, they DO NOT work for this. I've tried. Anyway, once you're outside you're all free to kill
off the bonus bosses at your leisure, without a stupid timer counting down. Now, if you have a really overpowered party for whatever reason, you could have
one of your party members stay behind inside the fort while the rest of you wander off to kill the generals, then when you guys are done, go stand outside
the southern drawbridge and have the guy you left inside lead Mr. Ghost to his altar thingy and you all run in when all of the drawbridges go down, run to
the altar, and continue the mission from there. Obviously if you're H/H'ing this, you won't be able to do this last bit, or if your party isn't strong
enough with only five people to kill off the bosses.
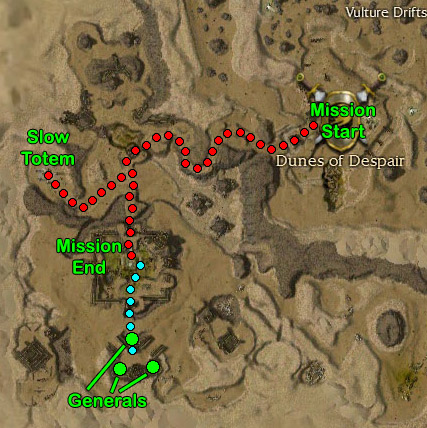
Mission map. Before doing anything, I suggest that only a healer talk to the Ghostly Hero, because he'll follow whomever spoke
to him and if he dies, you fail the mission, so having a healer talk to him keeps him relatively out of harm's way. So make sure your party knows this
before starting. If you're just H/H'ing this, then you really have no choice as to who talks to him, although I'll tell you now that talking to him a
second time causes him to stop following you (at which point, anybody else can talk to him and he'll follow them until they talk to him again, etc., etc.).
Talk to the Ghostly Hero so he can start the lengthy process of lowering the bridge behind him, then move out into the area. When you see some centaurs in
the distance, stop and prepare for battle. First one of them comes towards you by himself. Kill him, and the other two should be on their way towards you.
Continue onwards and do the same with the second group of centaurs. This is the last group that splits up like this so enjoy it while it lasts. Round the
bend and wait for this group of centaurs to come to you. Kill them, then stop right after these two sandy hills on your left. If you look west, you'll
see another group of centaurs. Pull them towards you. Yes I know, there are no other enemies nearby, but there's this giant wurm far to the left of this
group of centaurs who will fire upon where the centaurs are currently standing (and no, the wurm's attacks don't hurt the centaurs, but they sure do hurt
you). So pull them towards you, kill them, then take the Ghost towards the wurm so he can lower the bridge here. You can kill the wurm using spells or
ranged attacks while the Ghost is lowering the bridge. Once the bridge is lowered, you can go around and finish off the wurm if he's still alive. Go
south a bit and kill off the mesmer boss here and his mob to trigger a cutscene. After the cutscene, talk to the ghost for him to stay put, because we
don't want him to open the gate just yet. Go forwards and kill off the Enchanted Bows on either side of the drawbridge, then grab Mr. Ghost again and head
west. Yes, away from the fort base thing. We're gonna grab something real quick, and it has absolutely nothing to do with the bonus, so all of you, go
west. Shoo shoo shoo! Turn south when you find the wall, go left and kill the centaurs, who apparently don't attack back unless you're melee (they would
attack if you'd taken a different route, because that route would've alerted another centaur, who runs towards them, in case you're wondering why they're
just letting you kill them). After they're dead, go northwest-ish til the end of the area to find a bunch of centaurs guarding a shrine of sorts. Pull
some of the centaurs away so you don't have the entire mob attacking you at the same time, then grab the Slow Totem from their shrine once they're all dead.
Return to the fort and allow the Ghost to lower the drawbridge. Talk to him again so that he'll wait at the beginning of the bridge, then drop the Slow
Totem in the middle of the shady area after the bridge. Back up until you're about half an aggro circle in front of the ghost, and wait. All of the troops
inside of the fort will now attack you, but only a few at a time, and the Slow Totem prevents them from rushing you. Stay here until no more enemies come
out to attack you. Grab the slow totem, drop it at the enemy Ghost's feet, and kill him. Your Ghost now takes up position on the altar. Now you have to
defend him from the oncoming assault of Forgotten until the timer reaches zero. This is the only mission in the entire game where you actually want the
timer to reach zero, because that ends the mission whether you're still fighting or not. Make sure you take out any Arcanists first because of their rather
powerful earth magic.
Now, if you either read the first paragraph of this section and decided that was nonsense, or tried that method and got sick of not getting any corpses
but you still want to do the bonus, this section's for you. The first groups of enemies that appear to attack your Ghost inside the fort are 100% made
up of Arcanists. Once the Arcanists are dead and you haven't spotted any more coming, head south (you might find a group waiting here when you do. If so,
kill them). Cross the southern drawbridge, and kill the boss and his cronies that are directly in front of you. Once they're dead, a group spawns to go
attack your Ghost. However, if you have someone looking out for them (they spawn just within radar range just west of your position), you can aggro them
and make them attack you at your current position so they never reach your Ghost (have the person watching for them go aggro them). If you don't manage
to catch them, run back inside and head them off at the west drawbridge. If you have to do this, might as well stay here and wait until you kill off the
next wave of attackers. Ignore any wurms that spawn outside the fort. Once you reach another gap in attackers, run like heck back through the fort and
across the southern drawbridge again (unless you aggrod the spawned group, in which case you're still here). Now, just south of where the first boss
group out here was is some sort of half-assed building thing. In there are the two last generals; one on the left and one on the right. If your team has
a really high damage output, then you should be able to kill off these two bosses before anything even starts attacking the Ghost inside the fort. Just
make sure that you aggro the third boss group when you have only one or two enemies left in the second boss' group (do not aggro them both at once unless
you enjoy pain). Of course, if you did the mission already then it doesn't matter if the Ghost dies as long as you defeat these two bosses here. If you've
got a minion master or a spirit spammer (or both) in your party, with a good number of minions (10)/spirits (five?), you can let the minions/spirits finish
off the last man standing in the boss group and run back into the fort to wait for the next wave of attackers (as long as the last man standing isn't one
of the bosses). From here, just keep the Ghost alive until the timer runs out and everything will be awesome.

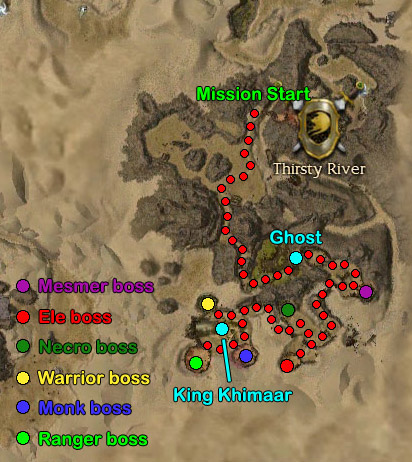
Recommended level: 19
My current level: me: 19, Acolyte Sousuke (hero): 18, Vekk (hero): 20, Olias (hero): 19, Alesia: 17, Claude: 17
Mission map. This mission is awesome for capping elites because a boss for each (core) profession is guaranteed to be in
this mission in the same location each and every time you do this mission. So yay. (and yes, I've marked them on the mission map)
When you load into the mission, you have to get to the real mission area, which is kinda annoying. But at least you can use this time to
increase your morale by killing sand giants (yes, the game tells you this, and no, killing sand giants anywhere else besides this mission will not grant
you a morale boost). Although generally you don't really need the morale from these guys, since you're gonna be killing a crapton of bosses in this mission
(which is why I've not marked the sand giant locations on the mission map). So do what you will. I can tell you that in the next area will be two sand
giants that are directly on the mission route, so there's really no need to wander about here hunting giants. Just head south (beware of tons of devourer
popups from now until you talk to the Ghost. Also, there's probably a sand giant in your way to the south as well) then up an inclined path (more devourer
pops), left, right, left again to enter into an open area (where the two sand giants I mentioned earlier are). To reach the Ghost and start the actual
point of this mission, hug the right wall and then head left up a wooden ramp, then right to find him outside of a closed gate. Talk to him to trigger a
cinematic, in which he explains what in the name of cheese you're even doing here.
Now, your priority targets in this mission should NOT be the bosses, but the enemies called Enemy Priest (each boss will have one in their little room with them).
See, not only do these priests heal your enemies, but all of the enemies in the mob aligned with that particular boss (in this first area that would be
every single enemy in this area) will be automatically res'd every time the timer reaches the 2min mark or any multiple of two (so, 2:00, 4:00, 6:00, etc.,
etc.) unless that boss' priest is dead (regardless of if you killed the boss or not). So once you clear out any patrols and go to aggro the enemies right
with the boss make sure you kill the priest first.
I suggest talking to the Ghost again after he opens the gate to make him wait there because, as in the previous mission, if he dies you fail the mission
and have to start over again. Hug the left wall once inside, let the first group come to you (beware of the Illusionists' AoE skill Chaos Storm, which
can hurt pretty badly if a lot of your party members decide to just stand in the bloody thing and die). Then continue east, pull the second group towards
you and kill them. Now, aggro the boss group and focus your attacks on his priest. Once the entire group is dead, the timer stops and the Ghost runs to
the exit gate to open it. Talk to him again after he does so he can follow you to the gate into area two, otherwise there's nobody to open that. Once
he opens the gate into area two, talk to him again to leave him there where he'll be safe.
Yes yes, I know, the stupid timer starts while Mr. Slow Ghost Man over here is still opening the gate. Anyway, once the gate opens the enemies inside
start running about seemingly randomly. DO NOT go right at the moment. Hug the left wall to not aggro the enemies that are running around like maniacs
to your right, because those guys belong to the second boss in this area and not the boss we're going after right now (so if you kill them, not only will
you waste time for the current boss, but they'll res soon enough anyway, so it's just a hassle and a waste of time to kill them right now). So yeah, hug
the left wall, and soon a mob of enemies will come around the bend from the left and attack you. You'll probably also aggro a second group from the left,
this time of Arcanists, so be very aware that they almost 100% will be aggrod and be ready to heal the damage from their powerful earth magic spells.
However, having an mm here will allow their minions to prove as nice destractions for the Arcanists (hopefully) instead of your actual party. Once those
guys are dead, charge into the boss room and kill the priest, but be aware that this is an ele boss, so basically a souped-up version of the Arcanists you
just fought. Once that mob is dead, I suggest regenerating HP/energy, since the timer (which is still running) won't affect the ele boss' mob at all.
You can however walk to the point under the bridge and wait there until the timer reaches 3:50 or so (or 5:50 or 7:50, you get the picture). When it reaches
that number, go ahead and start attacking the mob that's running back and forth in front of you (if you'd started earlier, you would've probably killed
enemies before the timer reached a multiple of two, and those enemies would've just res'd). Work your way northwest and kill the second group outside of
the other boss room, then attack the necro boss' priest. Once all of the necro boss' friends are dead, Mr. Ghost runs to the exit gate (it's behind you and
to the left when facing the necro boss room). Again, talk to him for him to follow you to the gate into the third area, then talk to him again after he
opens it for him to stay here out of danger.
Alright, this is the last area but if you're good at pattern recognition, you'll know that the third area means three bosses. Most people take the bosses
in a counter-clockwise motion, starting with the boss on your right, then the one in the back, then the one on the left because the left boss is always
the monk boss and a monk boss plus an enemy priest is just obnoxious. BUT. If you want the bonus, you'll want to kill the right boss first, then
the left boss (the monk), THEN the boss in the back. This is because the bonus involves making sure the ghost (not the Ghostly Hero) near the middle of
this area doesn't get killed by enemies, and that you don't take longer than ten minutes to clear this entire third area. So I'm gonna write this third
area like as if you're trying for the bonus, since it's basically the same thing since the order you kill the bosses in doesn't matter for the actual
mission. Anyway. Hug the right wall (don't aggro anything inside the boss room yet) and pull the closest group of evil thingies to the right (away from
the bonus ghost). Kill them, then run in and kill the warrior boss' priest. Go ahead and kill the warrior boss and any of his cronies inside this room
after the priest is dead. Now go back outside and keep the bonus ghost within your aggro circle in case some of the monk boss' mob go to attack him while
you're waiting out the timer for 1:50, 3:50, or 5:50, etc. Once you reach your magic 50 number, run around the left side of this altar thingy in the
middle and towards the monk boss' room (don't aggro anything inside the room yet). Grab any enemies that patrol around on this side of the area outside
of the monk boss room so that they don't go kill Mr. Bonus Ghost, then once they're dead go concentrate all of your efforts on the monk boss' priest. If
you have minions or ritualist spirits they will help to keep the monk boss busy trying to heal multiple targets at once instead of only healing the priest.
If you don't have an mm or a spirit spammer then get one of your high damage output party members to attack the monk boss while everybody else attacks the
priest so the monk boss has something else to focus his attention on than his dying priest. After the priest is dead, kill off the rest of the enemies
inside the boss room and go back outside. Stay out of aggro range of any of the last boss' dudes until your magic 50 number, then go at it. You shouldn't
have to worry about any of his guys attacking the bonus ghost at this point since they're all here in the back so take them out in whatever order you
want. Just don't forget that the priest is the important bit (should I still have to say that at this point?). Once all of the enemies in this area are
dead, the ending cinematic triggers. Woo! Next?
I Don't Think Desert Makes a Very Good Dessert
There's Something Looming on the Horizon
Everything Went [BOOM]
Of Princes and Kings and Banishings
I've Got Snow in My Boots
Corpsicle Alert!
From Snow to Sand in 2.5 Seconds
Of Lions and Lambs
White Mantle, Coast to Coast
In the Jungle, the Deadly Jungle
The Shining Blade's Labyrinth
Fear and Loathing in Maguuma

