

Alright, before we get down to business, let's get that last 15 attribute points quest out of the way. Go out into Frozen Forest (by the way, lots of
elite skills to cap in this explorable area, so take some cap sigs if you're interested) then go left when the path splits (going right leads to a dead
end), then right when it splits again. When the path opens up head southwest across a bridge. DO NOT overaggro around here or you will die. Beware any
groups with multiple seige golems. Remember: Those who learn to run away live to fight another day. So if you get overwhelmed, just fall back. Head
northwest, then turn the corner and head southwest. You'll eventually see some houses on your left. Right after you pass the first house there is a path
going down on your left (kinda hidden, but there are enemies down there). Go down and continue southwest (go left to get around the two houses here) then
immediately turn northwest after the two houses I just mentioned. The Azure Shadows around here can be a real pain, especially since they also come in
popups. Keep going forwards, and try not to aggro the Stone Summit on the hill on your left (unless there's a boss up there with a skill you want). This
path has a lot of Azure pops, by the way. Also, ignore the Stone Summit down below on your right, unless they've got a boss with skills you want. At the
end of this path there are three ways you can go: north, west, and northwest. Take the northwest path across the bridge and go into town (yes yes, I know
the NPC is right outside the portal, but you'll want this town, especially if you like capping skills). OK, back into the Frozen Forest! Talk to Sanyi
just outside. SHe'll immediately start walking off. Don't worry, though, all of the enemies ignore her completely so you don't have to kamikaze off after
her. Go east from town and then south across the bridge. You'll soon notice some new enemies that weren't here just a short while ago: Mragga Spawns.
They don't belong to any mobs so you can just pull them by themselves if you want to. Turn left after the bridge, then north as soon as you can (Sanyi
probably stopped around here if you kill things too slowly. Just get near her to get her moving again. From here on out, there are no more enemies until
your starburst, unless you are incredibly unlucky. Once Sanyi gets to the starburst she starts monologuing. I suggest backing up as soon as she starts
talking, cause after like five sentences (when she says "... after I swallow your soul!") she turns into a giant monster-ghost thing, and spawns about four
Mragga Spawns. Get rid of the spawns first because they are rather annoying and easy to kill, then concentrate on Mragga herself. Be careful cause she
likes to use vamp skills (i.e., health-stealing skills) and her elite skill (Grenth's Balance) will take up to 50% of a party member's max HP away and gives
it to her. Tossing Meteor Shower or Maelstrom (or both! Whee!) at her makes her easy as cake. Mmm... cake. Once she's dead, go demand an explanation
from Vanyi (in Drok's)!! Huh. Well, apparently she was just under Sanyi/Mragga's spell, and didn't mean to send you off to your non-doom. She gives you
5,000 EXP and your last 15 attribute points. Yey! You should now have 200 attribute points total, if you set all of your attributes to zero. If not,
check the third paragraph of the Augury Rock section on
this page for the first 15 attribute point quest. Well, unless you're
(somehow) not lv 20 yet, in which case you'd not have 200 points yet even if you did both quests. Anyway, back to Iron Mines for the mission!
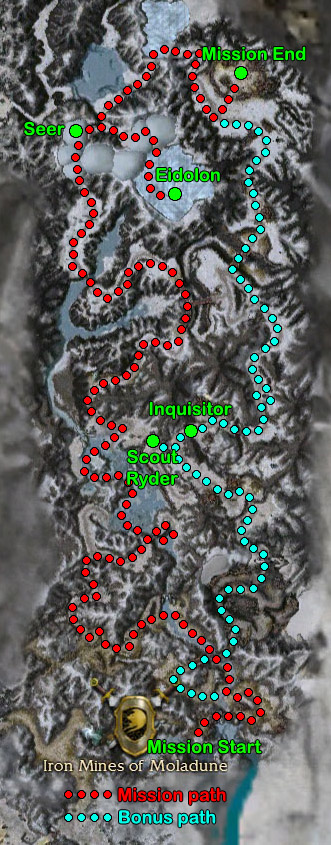
Mission map. As I'm sure you've heard me say about a million times before, I'm writing this walkthrough as though all of
my readers are going through each of these missions for the first time. That being said, there is an alternate path in this mission for those of you who
have already gotten infused before and want to skip all of that nonsense. (yes, there are other places in this campaign where you can get infused, but if
you're following the story you wouldn't've gotten there yet) It also takes you through the bonus area, but is chock full of Mursaat (which
is why I say it's for those of you whom are already infused for whatever reason). So if you fit this category, go ahead and follow the teal path from
near the beginning of the mission all the way to the Mission End marker. Again, this path has a crapton of Mursaat, so should only be attempted by an
infused party. I will not walk you through this path. For those of you who aren't infused, I will cover the bonus in this section, so don't think that
I'm gonna ignore that just cause you're not infused. After all, infusion happens during this mission (it's pretty much the point of the entire mission,
apart from killing Markis). Anyway, moving on.
You load on one side of a bridge. On the other side, as soon as you approach, a group of White Mantle will attack a group of Stone Summit. Generally,
the Summit win. You can, however, just leave these mobs to their own devices and avoid them completely if you're quick enough, as if you run past them
while they're fighting they'll almost always ignore you. Whatever you decide to do, eventually you will head down onto a frozen river. You'll see some
more White Mantle on the opposite bank. DO NOT aggro them, as they have some Mursaat with them. Yes yes, I know, Markis is up there, hold yer horses.
Follow the frozen river (stay on the ice) til the end of the river (watch out for Azure Shadow popups on the right bank and possibly on the last stretch
of river, and also the really annoying KD (knock-down) skill the Tundra Giants have (Giant Stomp). Head east onto the other bank, through the mobs of
Tundra Giants, and then head north through some mobs of Mountain Trolls. You'll soon come across a large mob of trolls on/near some steps. Try to pull
some away from the others so as to not get overrun (although if you've got a nice army of minions with you, they shouldn't be too much trouble even if
they all come at you). Once you reach where the path splits, take the right route, as going left can be a huge pain in the arse. Kill off the White
Mantle, including the Engineer, and try not to aggro the group down below yet (although even if you do, they still have to come back up here before they
can attack you. It's just easier if you don't because each White Mantle mob has its own healer and it can get annoying to have two Abbots healing your
enemies, especially if one's down below out of line of sight). Go down onto the ice (yes, that annoying slowing effect exists here too), around, and under
the bridge you were just on, and stick to the left side of the frozen lake as there are multiple catapults firing on various sections of the lake which you
can't disable at the moment (and by the time you can, it becomes irrelevant anyway). You'll find two Summit bosses by sticking to the left side of the lake,
but make sure you pull any bosses out of the area of fire of the catapults so that you don't get wiped out by the catas. Around this time, you'll hear
someone called Shining Blade Scout Ryder screaming her bloody head off about bodies everywhere. Just ignore her, as you can't get to her right now anyway
(and won't get to her at all if you don't want the bonus).
Once you get to the other side of the lake (the northeastern side), get back up onto solid ground, kill off the trolls, and keep following the path.
You'll eventually hear yet another catapult firing, but this one you can't avoid. Stop before the bridge and make sure all of your HP/energy has regenerated,
then RUN THE HELL ACROSS THE BRIDGE. This is just like that hill in the previous mission, in that you should NOT stop at any point on this bridge, I don't
care if you get hit by the catapult. Once you are off the bridge, you are out of firing range, so stop here and heal again (and res any party members
who died, although if you kept running no one should have died). Continue on. OK, from here up until the cutscene you'll be fighting nothing but smiting
monk enemies (except for maybe an upcoming boss, although he might be one as well), so you're not gonna be able to keep many (if any) minions if you're
using them. Just a heads up. Also, the griffons here have an elite skill called Spell Breaker, so either start casting spells before you aggro them, or
just rely on physical attacks for these guys. Keep following the path around til you find another bridge. After this bridge there will be a ton of Azure
Shadow pops. There's also a random shadow boss wandering about this area. Don't rush the boss, though, cause there are one or two shadow pops between
you and him, so take it slow. Keep heading north, but stop before you enter the cave here, as there are a crapton of shadows in there (popups). So regen
before going in. If you're being pummeled by the mobs in here, have someone keep running north to the Seer there (although if you do this you'll have to
skip the cutscene or risk being killed during it by the shadows attacking you). If you kill off all the shadows, continue to the Seer at your own leisure
and watch the cutscene without any worries.
The Seer informs you that she's been expecting you. She also says that she can help you in your quest, specifically by infusing your armour. Despite how
she words things, infusion doesn't make you completely immune to everything the Mursaat throw at you. What it does, however, is significantly reduce the
damage you take from the Mursaat's special skill, Spectral Agony. Basically, if Spectral Agony is cast on an average uninfused character, it will pretty
much kill them in 3-4 seconds (according to
the GWWiki page on Spectral Agony, Spectral Agony
will deal 600 total damage to a character in five seconds. So yeah. You want to be infused. It doesn't completely nullify the skill, but 75 total dmg
is much more preferable than 600 dmg. :op There is a catch, however: In order for her to infuse your armour (and she can only infuse one set of armour
at a time, so make sure you're infusing the set you plan on using for the rest of this game, unless you wanna do this part of the mission again later) you
must first hunt down and kill an Eidolon. Fortunately, there's one in a cave nearby, so... hop to it! Leave the Seer's cave and head right. Yes, there's
a boss (not the Eidolon) about five feet away from you, but be careful as there are a ton of Azure Shadows in here, popups or otherwise. Find your way to
the frozen lake in here, stick to the right bank, and then head left across a bridge of snow. You should have spotted the Eidolon by now. This thing
doesn't really do much damage. The only annoying thing about it is its elite, Mist Form, which nullifies attacks for a certain length of time. Anyway,
once it is dead it will drop a Spectral Essence bundle. Have someone pick it up (doesn't matter who, as you won't be fighting anything before you give it
back to the Seer, unless you randomly aggro something on the lake) and take it back to the Seer. Once she takes it from that party member, make sure all
of your non-hench party members talk to her to get infused. Now, on with the rest of the mission!
Leave the Seer's cave again, but this time head left. You will soon see the first Mursaat in this mission (unless you took the teal path on my map, in
which case, why are you reading this?). Alright, from here on out, Mursaat Monks are your first priority when picking targets. White Mantle Abbots are
also high on the list, but if there's a Mursaat Monk and a White Mantle Abbot/Priest in the group, target the Mursaat first. If neither of those
enemies are present, concentrate on anything Mursaat or Jade. Jade Armour enemies are the most dangerous of the Mursaat, if you ask me, especially if
you have a mostly-squishy (i.e., caster) party. Anyway. Continue on until you reach an open area, at which point you should stick to the right side and
pull any groups towards the right wall. Now, if you don't want the bonus, skip the next paragraph.
Stick to the right edge of this area and avoid the area to the north. Head to the teal path on the map, that starts near your present location (i.e., don't
go back to the beginning of the mission). You'll see a path going up and a crapton of Mursaat. Try to pull some of them towards you so you don't get
overwhelmed with enemies (although only the boss is not part of the same group), then go up the path. There are lots of Mursaat bosses along the way here,
as well (I hope you brought some cap sigs!). Follow the path, then go down across the large bridge when you find it. On the other side of the bridge
hang an immediate left, and you can avoid most of the enemies in this one area by hugging the left side of the area. Keep heading southeast on the path
out of this triangle-shaped area, and here you'll have a short respite where there are no enemies for about fifty feet. After the second turn in the path
here you'll find more enemies. I highly suggest killing everything in your direct path from here on out. You'll see why soon enough. Anyway, even though
you can generally sneak by the enemies on the hill to your left here, kill them anyway. Continue along the path and then hang a right across the bridge.
Follow the path heading west and you'll enter a fort-like area. You'll see Shining Blade Scout Ryder up ahead if you hold down the right Alt key (you know,
that panicking person who was screaming her head off earlier), but don't talk to her yet. If you have an MM in your party, go ahead and wipe out the
White Mantle in this fort place to replenish your stock of minions (killing off the engineers also gives you a morale boost). When you're done preparing,
go stand where the Inquisitor dot is on my map, and then have ONE party member go talk to Ms. Screamer over there (Ryder). Ryder starts explaining something
but that one party member should run back to the group now. As soon as Ryder finishes explaining (she says two sentences about some Mursaat boss called
The Inquisitor reading her mind and that you have to catch him), this Inquisitor and two Mursaat Mesmer buddies of his spawn where his dot is on the map.
Basically, you have to kill him before he escapes (his escape, I believe, is about where the teal path on my map starts, near the Mission End marker). If
you positioned yourself just right, your group will be body-blocking him and he's too dumb to move around you. If not, don't worry too much cause he's
not all that fast and if you cleared the path starting from where I told you to, he'll be easy to get rid of). Once he's dead (his Mursaat buddies don't
count, but I suggest killing at least one of them first so they stop being annoying, as long as The Inquisitor isn't getting away) the bonus is complete,
so head back up the path to where we left the non-bonus guys.
Approach the fort-type cliff place to the north. I highly suggest taking out the two mobs on either hill first, although if you've got minions you will
probably aggro Markis in the bargain. From there it'd be easier if you just pulled Markis towards one of the cliffs to kill him, especially if you want
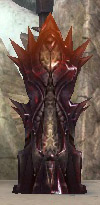
to cap his elite skill (Barrage, very good for rangers). Either way, the mission doesn't finish until you kill Markis' four Jade buddies (who spawn when
you get close enough to the purple blobby rock thingies behind Markis, pictured right). Only two will spawn at a time, so don't worry too much about them.
Once they are dead, the mission ends. Evennia curses Markis for all he has done, and in another area of the Shiverpeaks, it seems the Stone Summit are
getting the better of our Deldrimor allies. Brechnar begs his brother to escape before the Summit get him, as well.


One note I'd like to make before we get started on the actual mission: The second town that offers elite/15k armour is very close to this mission outpost.
Again, I won't give you detailed directions since it's not part of the storyline, but check the
Southern Shiverpeaks
region map to see where it's located (the town is called Marhan's Grotto). Now, on with the show!
Mission map. By the way? Minions are VERY useful in this mission. You load in a small enclosed area, facing a wall. ...
whyyy... Turn slightly to the left to find King Jalis and some dwarves. Have a caster that doesn't have an obsession with running into the fray talk to
King Jalis, as he has a tendency to follow whomever talks to him first, but unlike the Ghostly Hero from some of the desert missions, you can't make him
stay in one place or follow someone else. And yes, if he dies, you fail the mission. The gate opens as soon as someone speaks to Jalis. Head down the
path and hang a sharp right. Remember that Summit Giant Herders cause knockdown so if you have important spells with a long cast time you might want to
take care of the herders first. Head south and stick to the rim of this area, then go up the hill and take out the enemies up there (this way you avoid the
second mob). Take out the second mob to the north when you're ready, and head across the bridge. Stop on the last 1/3 of the bridge and have one of your
party members pull the mob on the other side of the bridge towards you. Around the time this mob is almost dead, another mob (including a boss) comes down
the hill towards you, which is why you pulled the first mob. Kill the boss mob and continue north (don't go right), then stop about halfway down the downwards
slope of this hill and destroy the nearby patrol.
Look down the hill to your left to see a gate. Before you enter, make sure that everyone's fully healed
and has full energy bars. The game will be pinging like mad at this point, but only go in when you're ready, cause this is about to be a battle zone. You
need to take out the mob right beyond the gate as quickly as possible, because as soon as you go inside another mob heads towards your position from the
left. And yeah, the frost giants also cause KD, so be aware of that. Continue left and take out the wandering mob I just mentioned, continue west, then
follow the path to the right to take out the next group. You can stop and regen here if you need to, then attack the mob heading towards you from the
northeast. After they're dead, take out the stationary group to the east. There's another wandering mob heading towards you from the same direction as
the previous one, cept they won't reach your current position, so just go to them and get rid of them. Go southeast, passing a bridge on your left, and
keep going til you see another wandering mob coming towards you from the east. After they are dead, go up the path they came down from and kill the boss
mob in the clearing to your left. Also, even though I call it a boss mob, the mob will not aggro if you pull the boss towards you with a bow or something
(at least, not usually). But that's up to you. While you're down here, try to take out the mobs up above while exploiting the fact that they can't shoot
arrows through walls (although at some angles they can actually hit you, so stand as close to the wall as possible to avoid this). Your mm will probably
make some minions that end up stranded up top, which is good because they'll distract the wandering mob. Head east and north to a closed gate that Jalis
will open. Go finish off the mob that the minions would have aggrod, grab your loot from the other two mobs you killed from below, then follow the path
into the fort area.
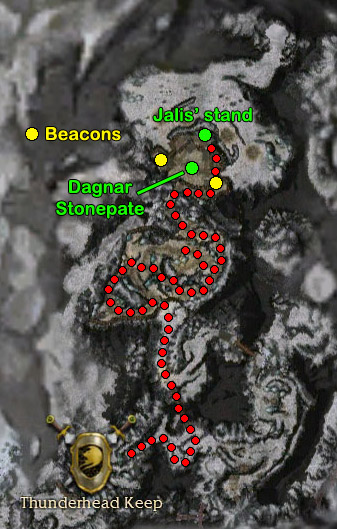
You'll soon get a message to kill Dagnar Stonepate. Yeah, you remember him. The guy who killed Rurik? Anyway, continue to the east,
and when you can't go east anymore, make note of this green thing over here. Yeah, more beacons. There are two of them (one's on the opposite side of the
fort from this one, but they are only required for the bonus. While we're in a lull in fighting here, lemme just explain the rest of the mission and the
bonus real quick, as you won't be moving from this area for the rest of this mission. So, as soon as you kill Dagnar, you get a cinematic in which the
White Mantle arrive and start attacking the fort. After the cinematic, you have to stay here and protect King Jalis from the rest of the Stone Summit that
show up, and the White Mantle (and Mursaat) that also come along. This goes on for a VERY long time, but the bonus, which requires you to light both beacons
in like the first thirty seconds after the cinematic ends, will call even MORE White Mantle and Mursaat to attack the fort, sometimes including a really
tough boss that also hits really hard. So yeah, that's pretty much it. Let's get back to business, now that you know what's up. Lightning the beacons is
up to you, and the rest of this walkthrough has no deviations based on whether you choose to do the bonus or not, so I'll stop talking about the bonus now.
Continue along the outer wall of this area and cross the bridge. Make note of the Firing Levers you are passing on your right (there's another set on the
other side of the fort too) for later. Also, try not to aggro anything down below yet either. Once everything up top is dead, go ahead and pull one of
the mobs up the steps towards you. Try to leave Dagnar for last, just to make things less hectic. He's a pushover, though.
After all of the enemies in the fort are dead (not just Dagnar), a cinematic starts in which a spectre of Vizier Khilbron appears and warns you that your
job in this mission isn't done yet. The White Mantle have followed you here and are on their way to attack the fort in full force. If you're gonna do the
bonus, remember that you only have a short time to light both beacons after the cinematic ends. It's a lot easier if you have more than one real person in
your party, but if you're in the mood for henching it, it's still doable. Just start running left past the trebuchets as soon as the cinematic ends, pick
up the torch that somehow magically appeared right next to the beacon, light the beacon, DROP THE TORCH cause carrying stuff makes you run slower, then do
a 180. Find the stairs behind you that lead back down to where Dagnar was, run across the open area, up the flight of stairs on the other side, grab the
other torch there, and light the second torch. Keep an eye on your chat log, cause if you take too long the dwarves stuck outside will say "The end is near!
Great Dwarf save us!" So if they say that, then you won't be able to do the bonus.
Now, there are two ways to get through the rest of this mission, regardless of whether you're doing the bonus or not. By the way, Jalis stays up here where
you spawned after the cinematic and DOES NOT MOVE, so don't worry about him running off anymore. The most common strategy is to divide
your party into two, and if you're gonna do this both of your healers had better be awesome, and the rest of the party had better have a high damage output,
or just have two mm's. Anyway, what you do for this strategy is divide the party down the middle with a healer in each half-party, and send each half-party
to one of the gates that lead outside (the gates are right under the beacons). Now, just stay put here and kill anything that tries to get inside. These
waves aren't continuous, so have someone in each half-party be ready to run up to the trebuchets (remember, there's a set on each side of the fort) whenever
there's a lull in the fighting and just have them run back and forth between the two levers on their side (yeah, two on each side, not very far away from
eachother) and firing them. If you look on your radar at the areas outside the walls between the trebuchets and where Jalis is, you'll see a round brown
patch surrounded by white snow (on each side). This is where the shots from the trebuchets land, and also where the waves of enemies that come towards the
fort tend to stop for whatever reason. Even if you don't manage to kill the mobs with the trebuchet shots, you can at least weaken them and then run back
down to join your respective half-party. Another thing to do if there's a lull in the fighting on one side and the other half-party is getting slammed,
have some (or 3/4) of your half-party run over and give them a hand. Just make sure there's at least one person on each side at all times with an eagle eye
trained on their radar so they can give a shout out if anything starts heading towards that gate, at which point the 3/4 should go back to their own gate.
Yes, this method can work, but it takes a lot of skill from all members of the party, and a lot of coordination. This includes talking to eachother! And
yeah, you can do this method with heroes/henches using the flagging system, but the hench half of the party isn't that well-equipped to taking on a bunch
of Mursaat on their own, even if they are infused now. Plus, it requires that you have heroes, which you wouldn't if you're strictly a Prophecies character.
If you're just henching it (heroes or otherwise), or even if you're in a full party, check out the next paragraph for the other strategy.
The second strategy is for everyone to park themselves at the top of the stairs that lead down from where Jalis is waiting (not on top of Jalis, but the
top step of the stairs that lead down to where Dagnar was). All of the enemies are programmed to head towards Jalis' location, but don't be tempted to
run down there to meet them cause not only can you not see one gate when you are at the other gate, but there are two pathways on each side of the fort
that the enemies can and will take to get to Jalis and they don't all take the same path. You could just have one dude in your party be designated to run
down there and lead enemies back up to the rest of the party, but it's easier to just stay put. And don't get antsy when the enemies are taking awhile to
get to you. Just chill.
This mission takes forever, even if you kill the enemies really quickly. King Jalis has two lines of dialogue during the fighting that will let you know
about how much time is left before all of the enemies are dead. When he says "The Mantle followed you! Stand fast friends! This will be our finest hour!"
there's about 18 minutes left before the waves of enemies stop. When Jalis says "Be on your guard. The left hand of Grenth himself comes for us" you've
got about 12 minutes left. The very last wave of enemies shows up on the west side only, is composed solely of White Mantle, and has Confessor Dorian within
its ranks. Didn't he swear to kill us? Well, let's beat him to the punch! Literally! Once he's dead, go back to King Jalis to trigger the ending cinematic.
Apparently we've got to head west to the Ring of Fire, and Brechnar's decided to come with us. And an old, semi-familiar face shows up...
These Are Not Hot Springs
There's Something Looming on the Horizon
Everything Went [BOOM]
Of Princes and Kings and Banishings
I've Got Snow in My Boots
Corpsicle Alert!
From Snow to Sand in 2.5 Seconds
Of Lions and Lambs
White Mantle, Coast to Coast
In the Jungle, the Deadly Jungle
The Shining Blade's Labyrinth
Fear and Loathing in Maguuma
Ascension Contention
I Don't Think Desert Makes a Very Good Dessert
Do Not Meddle in the Affairs of Dragons, For Thou Art Crunchy And Taste Good With Ketchup
I Never Thought I Would Go Back to the Shiverpeaks. You'd Think I'd Remember to Pack Cold Weather Gear

