
Quests: Barradin's Advance, Vanguard Equipment, Scavengers in Old Ascalon, The Troublesome Artifact, Recruits for Hollis, Barradin's Stand,
Fires in the East, In Memory of Paulus
Skills: Heal Area (monk), Vital Blessing (monk), Resurrect (monk), Live Vicariously (monk)
Talk to Captain Arne (near Ellie Rigby) for some new quests. Tydus has new quests for you, too. Make sure you have the Cities of Ascalon quest I mentioned
earlier (from Symon the Scribe) before doing the next mission, or else you'll have to do it over again and that's just plain bleh. Why is this quest so
important, if the rewards for it are such rubbish? Well, don't take things at face value, my friend. That seemingly-ridiculous -50 HP Grim Cesta you get as
a reward from that quest is often sold for 4-5k to other players. So yes. DO THE QUEST. ^<__<^;;
Head to the Sanitarium and use
the map to find the Scavenger for one of Tydus' quests, and answer the following: 1) "What are you
doing here?", 2) "I have orders to clear the area of scavengers," and 3) "Only if you make yourself useful." After this "intense interrogation," he'll get
annoyed and leave, and the quest is complete. Map to Ascalon, get your EXP, then go talk to Grast to acquire Hollis' recruits. Lead them to Hollis, but
make sure they don't die!! If they die, you can't finish the quest and will have to start all over again. ^-__-^;; To acquire the reward for Barradin's
Advance, just talk to Hollis again. :op Easy, no? He then gives you the Barradin's Stand quest, which is just as "difficult." Just map to Piken and talk
to the Duke to complete this quest. :oD Make a quick detour to Ascalon City and talk to Captain Arne for the Fires in the East quest.
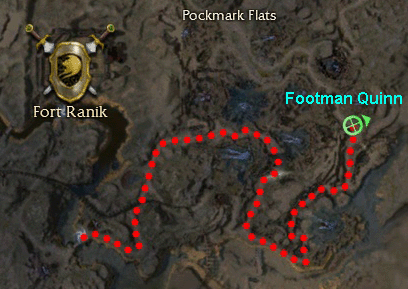
Map to Fort Ranik so we can do Vanguard Equipment, Protecting Ascalon, and that Ambassador's Quandary quest we got from Zain oh so long ago. Step outside
and talk to Gelsan the Outfitter in the blue tent on the right. Apparently some bandits have stolen it. Use
this map to find the
bandit in question, then carry the stuff back to Gelsan. ... who promptly informs you that the stuff you just retrieved wasn't what you came looking for.
^-__-^;; Well, at least he gives you what you want. Moving on! Use the same map to find the other bandit dude (why are there so many bandits here??) Torin
to fix Zain's little problem.
If you're a monk, use the same map to locate Paulus. When you find him, click on him to acquire an
item, then map to the Sanitarium quickly, as you are now poisoned. ^>__<^! Talk to Grazden for some new skills and another quest (In Memory of Paulus).
Turn in your quests in Ascalon City, and don't forget to talk to Zain for your reward for killing Torin. Also, don't forget to talk to Melka Blanston
outside of Ascalon City (she's on the left) about Paulus (if you're a monk), and her husband Gurn.
If you did In Memory of Paulus, you
get your first actual res spell. Yay, hard res!

Quests: Replacement Healers (monk), The Way of the Geomancer (ele), Unnatural Creatures (mesmer), Caravan in Trouble, The Geomancer's
Test (ele), Experimental Elixir (mesmer)
Skills: Infuse Health (monk), Strength of Honour (monk), Diversion (mesmer), Hamstring (war), Fireball (ele), Smite (monk), Shadow
of Fear (necro), Phantom Pain (mesmer), Lightning Reflexes (ranger), Magnetic Aura (ele), Earth Attunement (ele), Shatter Hex (mesmer)
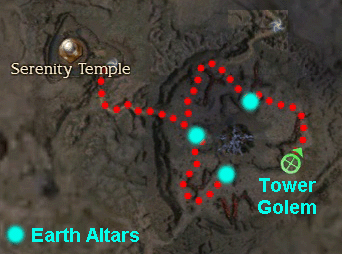
Enter Pockmark Flats from the portal near Fort Ranik, and use
this map to reach Serenity Temple. One of the annoying dudes
from Frontier Gate Fugitives is
on the way there (Footman Quinn). You will have to fight him, but he's really really easy
to kill. Once inside the Temple, talk to Priestess Rashenna to give her the "troublesome artifact" from Tydus. If you're a monk, mesmer, or ele, you can
get new quests here (which give you new skills).
Rashenna will give monks the Replacement Healers quest.
Ken Redstaff (I refuse to call him "Kendrick") will give eles two quests, but you must do The Way of the Geomancer before he'll give you
the second one, and
Erudine the Experimentalist will give mesmers two quests, but again, you must do Unnatural Creatures
before she'll give you the second one). Non-monk characters should read the part about Replacement Healers anyway (next paragraph), as there is
another quest in that area that all professions can do.
Devona is right outside of Serenity Temple, waiting for you (on the left). (
*Note: Whether
you complete this quest or not, once you acquire it, Devona will
always be standing in this location and you can get her to follow you and help kill
stuff every time you come out here) Head to the large, open area in Pockmark Flats, the one with the huge, giant crystal of DOOM right smack dab in the
middle.
On the way here, you would have killed a bunch of Hulking Earth Elementals. If you need to kill more (almost 100% sure you will),
rezone and kill the same ones again, then talk to Ken for your reward and the next quest. I hope you've saved your Scorched Lodestones that the elementals
dropped? Cause you'll need three for this next quest. Return to the large, open area and use this map to locate the shrines and
the Stone Golem that placing the lodestones on the altars summons. Kill it, then speak to Ken again for your new skills. Find the
Storm Rider boss (Grenn Mindvenom) in this area with your starburst (he's not on the map cause his location varies somewhat. He will always spawn in this
huge-ass crystal area though). Pick up the tissue sample and return to Erudine for your new spell and new quest. This new quest involves nothing other
than mapping to the Sanitarium and talking to Fadden (yeah, you know, the egg hunter dude from pre-searing). Hey, look, he's cured! A mesmer helping someone
other than themselves? ^O__o^;; That's new. Speak to Vassar for your reward. In this huge crystal area, take the path in the north part of this
area to reach the portal to the Eastern Frontier (you can see the portal at the top of the map I linked to for the ele quest in this paragraph). Mhenlo,
Cynn, and Devona are on the other side of the portal. Go towards Cynn and Mhenlo for them to start talking to some dude. When they finish talking, acquire
the Caravan in Trouble quest from Cynn, but don't go back through the portal yet (monk or not, we are continuing forward for a reason. You'll see why soon
enough).
Talk to Devona, then follow her as she runs off. Make sure she doesn't die, or else you fail the quest. Once you kill off
the Charr (they shouldn't be too difficult), the quest is complete. If you hold down Alt and look around, you'll see the other missing footman
from the Frontier Gate Fugitives quest,
BUT don't talk to him yet. Just remember where he is; we will get him in a minute (I have a map of
his location anyway, in case you're bad at remembering things :op ). If we do this quest now, it'll be a lot more annoying. Anyway. Return to the portal
to Pockmark Flats and go through it to find Mhenlo, Cynn, and the missing caravan. Move forwards a bit, and prepare to get attacked by a horde of Storm
Riders. Once they are all dead, talk to Laris (the merchant dude) for your reward.
Map back to the Temple and see Rashenna for your
EXP and new skills.
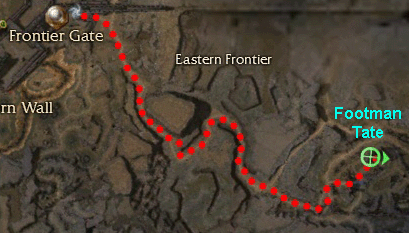
Now, head to the Frontier Gate so we can do the final bit of Frontier Gate Fugitives. First off, though, we'll get Fires in the East out of the way. Once
outside Frontier Gate, head left like you were going to Ruins of Surmia, but when you see a collector on your right (Paige Osbourne), use the path behind
her to reach a hidden new area. Keep heading north to find your targets, but pull carefully to avoid being overwhelmed. Be aware that there are devourer
popups in this area as well. If you're lucky, you can just pull the Flame Keepers away from everything else and finish this quest rather easily (there are
two of them). Once you're done with that, follow
the map to reach Footman Tate's area again. Make sure you kill all of
the enemies on the way (including the ones up high on ledges. Use spells if you don't have line of sight), cause you're gonna have to lead this guy back,
and if he dies you'll have to rezone and start over again. And if he aggros Whiptails on high ledges, he'll just stay there for the rest of forever instead
of following you, which is why I said to kill those too. ^-__-^;; When you find him, most of what you say to him doesn't really matter, as long as you say
"Everything will be alright" at some point during the conversation. Upon saying this, he will start following you. Lead him back to the Frontier Gate and,
like the supply column from earlier, make sure he goes inside before you do or you'll have to start over again. You might have to go halfway up the stairs
to the Frontier Gate before he'll go in on his own, though. Go inside to acquire your reward from Warmaster Riga.


Recommended level: 10
My current level: me (fire ele): 11, Alesia: 6, Orion: 6, Reyna: 6
Mission tiiiiiiiime!
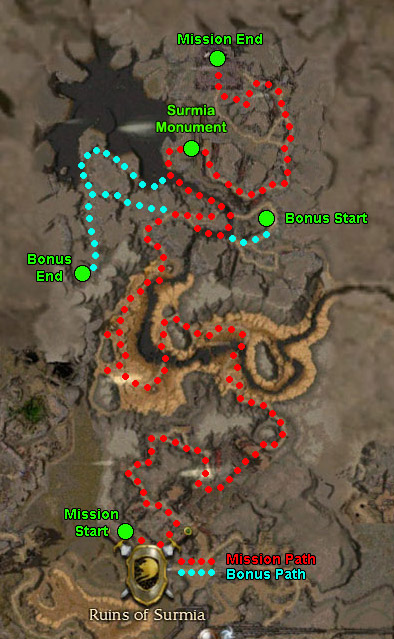
Mission map is here. Just one
warning before we start: Rurik is with you for
much of this mission. Yes, PRINCE Rurik. Also, he can be killed, and if he is, it's mission over for you. What makes this even worse is that Rurik... is
a suicidal MORON. He enjoys nothing more than running off by himself and aggroing a huge mob of deadly things while you're picking up loot or fighting
monsters that he somehow missed aggroing. So make sure your healer's got an eye on him at all times. Anyway. There are more sploding devourers in this
mission (I mentioned them in one of the Great Northern Wall sections) too, so keep that in mind as well. Also it hasn't mattered much before now, but whiptail devourers have a skill that
protects them from physical attacks so make sure you have at least one offensive caster in your party since while the lv 4's are still not much of a problem there are a bunch of lv 7 whiptails
here. Follow Rurik up and down and sideways and over hills and up and down stairs and through ruins that he's all angsty over. One more enemy note here: the Charr Chaots have Shatter Enchantment,
so if you use a lot of enchants (monks, I'm looking at you) try to use them sparingly around the chaots. sAfter you cross the river of tar the second time, you'll start finding Charr
bosses guarding some hut-looking things. These are where the prisoners mentioned at the end of the last Fort Ranik cinematic are being held. Watch Rurik
carefully here. He will run to the nearest enemy (I don't think the tar slowing effect even works on him) and start attacking, but if any boss around here
gets into his aggro bubble, Rurik will generally break off from his original target and make a beeline for the boss. The third and last prisoner hut in
this area is guarded by a popup devourer boss hiding in the tar outside of it. Defeating this boss and his also mostly-hidden mob triggers a cutscene in
which we meet Erol, who seems to have been here a rather long time.
Rurik promises Erol that he'll (or, we'll... thanks for dragging us into this, Rurik) free the rest of Erol's Flaming Scepter dudes, at the risk of being
captured by the Charr. Once you get to a large open area, head east up a hill to a gate. Once you've killed off the Charr outside of the closed gate,
Rurik will order you to go find another way in, cause he's too lazy to come with you any more. ... this is actually a good thing, cause he'll be safe out
here until you pull the lever on the other side. So yeah, NO MORE SUICIDAL RURIK! ... for now. ^>__>^;; Well, drop Rurik and Erol off here, and now we can
do the bonus (if you're not doing the bonus, go down into the tar and under the bridge where Rurik and Erol are, then go up the steep bank on your right,
and skip to the next paragraph). With Rurik at your back (hey, if he's gonna be a useless stump, then I've got a
right to use him as a signpost), go left and sludge through the tar to land on the other side. Kill off the boss here and talk to the NPC in the hut
(Breena Stavinson, who apparently generally doesn't get a green exclamation mark over her head til AFTER you talk to her. What the hell, woman?). Apparently, she can be killed by the boss, but
I've never come here and found her missing, so I dunno. If she is dead/missing, I guess you'll have to start over if you want the bonus, or finish the mission and do bonus later (yeah, in Prophecies
you don't need to do mission and bonus in the same run to get credit for both). Anyway, moving on from random speculation on the mortality of an NPC... Once you talk to the bonus chick STAY
THERE. Do not move. Four red dots will appear a ways behind and to the left of you. DO NOT AGGRO!! (aggro meaning getting them inside your aggro bubble) You must follow these four ember-bearer
Charr at a distance without fighting them, or else the door on the other side will NOT open, resulting in no bonus for you. So make sure everyone in your party knows
not to attack them until after the gate they open is opened. Trail the slow-moving procession (they actually move faster now than they used to) to the
other side of the area. Look, I know this is slow and takes forever but you HAVE to follow them. All the times I just stood by Breena and idled to go get a sandwich or write notes for this
walkthrough or whatever, being like "oh sure they can just walk slowly by themselves to the gate and I'll catch up later cause I run faster" either the entire mob or just the flame thingy they
are carrying gets stuck somewhere, and if all four charr AND the flame thingy don't reach the gate on the other side the gate won't open (yes, even if all four charr make it but the flame thingy
got stuck somewhere you're screwed for bonus), so just do us all a favour and, as boring and lame as it is, just follow them the entire way.
Once they open the gate you may go through and kill them off (kill the Charr Shaman first though, as they are healers), but you're
not done yet! Follow the map dots to the "Bonus End" marker and you'll reach a large flaming brazier guarded by the four flame keepers you are supposed to
kill. So... kill em already! Bonus, complete! Just be careful, as they all spam powerful fire spells, and four Fire Storms raining down on your low-level
heads while in close quarters == A Bad Idea. They don't really pull very far but you can hit one or two of them from the ground if you do it at an angle (not two at a time please, I mean aggro
one at a time).
Follow the cyan dots on the map to take a shortcut to join back up to the main mission path (and no, if you screw up the bonus somehow or it bugs out,
you can't use this second gate to get in here cause it only opens when the first gate opens).
The Surmia Monument for the Cities of Ascalon quest is around here, just before going through the doorway (hold down the left Alt key to see it). Now here
is where the mission gets rather difficult. If you are at a high enough level or have an mm (minion master) with you with a decent number of minions, you
can kill off the big mob in the middle before opening the gate for Rurik (so he doesn't get himself killed). Just make sure you wander around everywhere
in this area to make sure you got all of the Charr before pulling the lever to cue Rurik and Erol to join you. Also, be aware that the game mechanics have scripted these mobs to move towards
the square purple area at certain points if your party gets near this area so keep your eyes open for mobs moving towards you if you're clearing the area before grabbing Rurik. If you are still
at a low level (around 10-12 or so), just open the gate for Rurik and Erol and ignore the huge mob, just like Rurik says to (clearing the area is still doable around lv 11 but this is not recommended
if you are that low level and this is your first time doing this mission).
Whether you killed off the huge mob or not, free the Flaming Sceptre Mages from the boss (you need Rurik with you to do this, and if you don't do this, the
mission will not continue), then enter the topsy-turvy area (gods I hate this part. Not only is everything all angled weird, but if you're a low level,
you can get killed pretty easily). If you didn't kill the big mob before, wait here in the middle now. Charr will start appearing from all sides, but
only about three at a time unless you fail to kill them quickly enough. Either way, Rurik takes forever to open the door but when he does, the mission is
over, no matter how many Charr are left. Just make sure that you do not stray too far from Rurik while he's opening the door or else a rogue pack of Charr
might kill him. Even if you killed off the entire mob, stay with him in case you accidentally missed a group. Make sure you heal him when he needs it,
too. Rurik is about to run through this mystic portal thing in this seemingly dead end room when Erol discovers an item of apparently great importance.
After Rurik jabbers on about the item, you all run through the magic portal in the nick of time, leaving behind some rather confused Charr (and the Flaming
Scepter Mages we came all the way to the end for in the first place!).

Recommended level: 11
My current level: me: 11, Acolyte Sousuke (hero): 12, Alesia: 6, Orion: 6
Quests: Symon's History of Ascalon
Before starting the mission, use
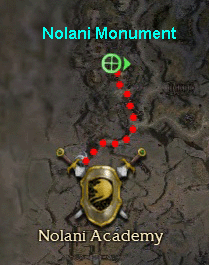
this map to locate the last monument for the Cities of Ascalon quest. Return to Symon to
acquire your reward. As mentioned previously, DO NOT SELL that Grim Cesta you get to a merchant, cause some people will pay quite a bit of money for it.
Yes, even though it knocks off 50HP. Trust me! Have I ever led you astray? I explained why people want it earlier on this page... Once you've done that,
exit Ascalon City and go see Witness Rastin (you remember, the dude near Ambassador Zain?) for a new quest. Apparently Symon wrote a book based on all of
the information we gathered for him. Well, talk to Symon, who says he needs five rolls of parchment to make the copy for Rastin. He says Artisan Daved will
have some. Yeah, that guy in front of the Sanitarium. Well, you can get the parchment one of two ways. The first way is easier: Find a Rare Material
Trader and buy five from him/her (there's one near the exit in Ascalon). The second way is cheaper: If you've acquired a ridiculous amount of wood planks,
you can get the aforementioned Artisan Daved to make you some parchment. You need five wood planks and 20g per roll of parchment. However you go about
obtaining the parchment, once you've got them go give them to Symon, then deliver the History to Rastin for your reward. Anyway, on to the Nolani mission!
One warning for the beginning: DO NOT OPEN THE GATE!! ^x__x^;; If you open it, all of the Charr outside rush in at once and slaughter everybody. I've even
seen it happen to a level 20 who claimed he could take them all on. Fun, no? ^-__-^;; Anyway.
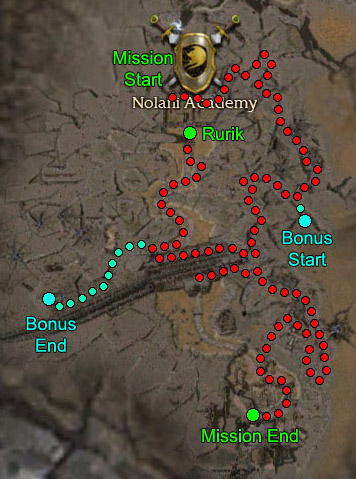
Mission map is here. Follow the
red dots to the east, killing enemies and picking up random ranger NPC's as you go. These NPC's will help you kill stuff, which is always a plus. At some
point you'll see a ton of gargoyles in the distance. Be careful, as they can kill lower level players rather easily, especially since most of them have
Conjure Phantasm. Try to pull only a few of them at a time so you don't get mobbed, but be aware that there are devourer pops on the cliffs above you that
will popup even if you're down below them. If you want the bonus, talk to the NPC that will soon be seen down a path on your left. Let someone who doesn't
need their weapons to fight carry the book (the best option is to have an ele carry it, since eles have energy storage, as I mentioned in a previous mission).
Keep following the map dots to reach a large stone structure guarded by Ascalonians (on the way it'll seem like there's a dead end blocked by a fallen tree,
but you can go around the left side of the tree to continue).
If you're not interested in doing the bonus, skip this paragraph. Alright, continue west, following the cyan map dots. Be careful as there are tons of
devourer popups around here. You'll eventually come to some stairs leading down into an area full of ghosts. There are more devourer popups on the wide
space of land to your right which will spawn even if you're not on their level, so you might want to take them out first before you go down the stairs to
avoid being attacked by ghosts on one side and mobs of devourers on the other. Yes, the ghosts will attack you. Why? Because they hate you. ... no, really.
They hate you cause the book has cursed you, but don't worry, they'll go away once the bonus is complete. Don't decide to run through them, though, as you
will most likely die, and that is Not Happy. They hit pretty damn hard for ghosts! Once the book is in place, talk to the very long-winded ghost that appears
behind you (when facing the pedestal), and bonus is done! (after he shuts up, that is...) Feel free to just run off to continue the mission as soon as the
ghost starts talking, as the bonus complete message will show up when he's done talking even if you're not near enough to hear what he's got to say, and he
really does have a lot to say.
Head to the Academy to rendezvous with Rurik; just make sure you kill all of the Charr in the immediate area before the door opens so Rurik doesn't die.
There are some Charr on a ledge on your left when facing the boss in front of the Academy that you don't have to kill since Rurik stays out of their range
of fire, but all of the Charr on ground level and the ones up on a hill on your right need to be killed off before Rurik shows up. Rurik comes out as soon
as the boss is dead, just so you know. Another small note here, there are some more random ranger NPC's that will follow you around that are near the Charr
I said you didn't have to kill. If you can make your way up there and then head a bit west, the NPC's should show up. I'm pretty sure they'll stop following
you after the imminent cutscene, so I'm not sure what purpose this particular group of NPC's actually serves... Anyway. Escort Rurik to the rather large
building you passed earlier (the gate-thing I mentioned) to trigger a cutscene (once Rurik gets there, anyway. He's kinda slow). After the cutscene,
follow Rurik the Rushing N00b War to make sure he doesn't die. Eventually, you'll reach another cutscene triggered by Rurik's arrival (once he gets up the
steps and has looked around for a bit). Afterwards, STAY WITH RURIK. I don't care about your drops or your minions rushing off or anything, cause a huge
mob of Charr show up behind you once Rurik runs off, and you'll get slaughtered if you stay there. And even if that mob doesn't slaughter you, the
other Charr Rurik is banzai-ing will kill him, thus causing you to fail the mission. So yeah. Stick with him. After going up a set of stairs and
yelling mean things at the group of Charr up there, Rurik apparently decides that he's bored of killing Charr, and DOES NOT MOVE for the rest of the bloody
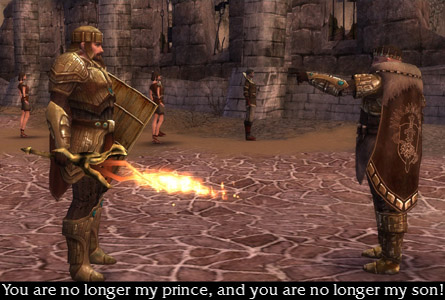
mission. So yeah, you have to kill the last boss on your own, sorry. ... huh, judging from the end cinematic, he really is sick of killing
Charr. He gets banished by his father the King, and decides to take you with him on an Epic Journey to the faroff lands of Kryta. Hey, don't drag us into
your mess! Well, I guess it's on to Yak's Bend, whether we like it or not!
I've Got Snow in My Boots
There's Something Looming on the Horizon
Everything Went [BOOM]

