
Quests: The Way is Blocked (primary), The Road to Borlis Pass, Shiverpeak Stragglers, The Missing Artisan, Helping the Dwarves,
A
Heart of Ice (elementalists), The Stone Summit Champion (mesmer), The Wayward Monk (monk), Renegade Necromancer (necro), Securing the Vale (war), Oswalt's
Epitaph, Stone Summit Beastmasters, Minaar's Trouble, Minaar's Worry, Iron Horse War Machine
Skills: Gale (ele), Mantra of Frost (mesmer), Remove Hex (necro), Suffering (necro), Debilitating Shot (ranger), Protector's Strike
(war), Whirlwind (ele), Ward Against Foes (ele), Ice Prison (ele), Fragility (mesmer), Channeling (mesmer), Power Spike (mesmer), Vigorous Spirit (monk),
Pacifism (monk), Divine Boon (monk), Necrotic Traversal (necro), Well of Blood (necro), Defile Flesh (necro), Swift Chop (war), Irresistable Blow (war),
Seeking Blade (war), Whirling Defense (ranger), Winter (ranger), Call of Protection (ranger)
You can upgrade your armour here. Talk to Captain Osric, who's a skill trainer, so check out what skills he can
teach you. I recommend acquiring the
following skills: For eles, Air Attunement, Enervating Charge, and Lightning Orb if you use
Air Magic (although you can get Lightning
Orb from a quest on the next page of this walkthrough, and Air Attunement from a different quest later on), Stone
Daggers if you use Earth (also can be
acquired for free from a quest later on though), Immolate if you're into Fire, Ice Spear if you like Water (but you'll
get this one for free before this
page is done), and Glyph of Elemental Power no matter what element you use (it's under No Attribute).
For
mesmers, check out Cry of Frustration (Domination), Empathy (Domination, if you're secondary mes you won't have this yet, and
while
you can get it for free later on, it's much much much later on (around page 9 of this walkthrough), Shatter Enchantment (Domination, you'll get it
for free
before the end of this page), Drain Enchantment (if you use Inspiration), Physical Resistance (also Inspiration), and Epidemic (no attribute).
For
necros think about buying Strip Enchantment (Blood, you'll get it for free before the end of this page), Animate Bone Fiend
(Death,
another one you'll get for free around page 9 of this walkthrough), and Death Nova (Death, you'll get it for free much later on).
My skill suggestions
for monks are Signet of Devotion (if you use Divine Favour), Healing Touch (Healing Prayers, and you do get
this one for free later
but it's also around page 9), Restore Life (Healing Prayers, and personally I think this is the best hard res skill in Prophecies,
so this one comes doubly
recommended from me), Mend Ailment (Protection, although you'll get it for free on the next walkthrough page), Protective Spirit
(Protection, you get this
for free further on, but I REALLY REALLY recommend getting this skill. You only really need four points in Protection Prayers
for this skill to be effective,
and it really comes in handy), and Judge's Insight (if you like Smiting).
For rangers I recommend Storm Chaser (Wilderness Survival,
you can get it for free from a quest later on) and Pin Down sometimes
has its uses, but you'll get it for free before this page is done.
Warriors should look into Disrupting Chop (Axe) and Final Thrust (Sword, and you'll get this for free on the next walkthrough page).
Osric also has a few quests, including your next primary (The Way is Blocked). I will tell you that The Way is Blocked and The Road to Borlis Pass are in
exactly the same location so either you can do both at the same time to kill two birds with one stone, or only take one of them now and do the other after
you finish the first one because having both in your list at the same time could get you killed if you're still at a pretty low level. It's up to you.
You can always abandon a quest if it seems too difficult for you right now, and then pick it up again later from the same quest-giver. Tabor Woolridge,
to the north of Osric, has another quest for you, and so does Grand Mason Stonecleaver (he's up a hill towards the back of this area). Talking to him
gives
you two new skills right off the bat, too. Warriors, you'll find somebody you knew once upon a time right next to the Grand Mason.
Van!
Hi! He was your first trainer ever! (if you're a warrior primary) He also has a quest for you. Next to the Grand Mason is
a guy
named Van the Warrior, who will give monks a quest involving speaking to Cynn the hothead. eeee.... If you're an ele, you'll
find
a familiar face straight across the fire from Tabor. It's Howland! You know, your very first trainer from the first time you stepped out of the gate of
Ascalon City in pre? (if you're a primary ele, anyway. Secondary eles won't have met him) He's got another quest for you. Near
the entrance of town, on the west side, is your first trainer ever, if you're a primary mesmer. Regardless of primary or secondary, she has a quest for
any mesmers out there. Necros, there's some mystery necro dude you've never seen before who has a quest for you. He's at the
back on the east side. Hey... why does everybody else get to see their first trainers and we don't? *talks to Morgan* Oh, well... well that... that explains
why. *sweatdrop* Take his quest for the sake of Necromancers everywhere!
Grab a party or some henches and head outside. We're gonna hit Shiverpeak Stragglers and The Missing Artisan (we'll also get Heart of
Ice out of the way, if you're an ele, and The Stone Summit Champion and Renegade Necromancer).
Take the road south, and talk to Guard Markus on the way for some info about the stragglers. First, though, take a left when the path splits.
A couple of feet in front of you is the Stone Summit Champion you need to kill. He's an ele, so a good idea would be to use Backfire
to make him hurt himself, since he has some sort of obsession with spamming Stone Daggers. Shatter Enchantment for his Aura of Restoration works pretty
well too. When you find some steps leading down to your right, kill the mob of ice golems there to trigger
Greplak Froststaff's
surrender. You'll have to deal with another mob of ice golems before you can talk to him though. Talk to him to get the heart.
Keep heading south.
You'll soon come across some minions with names like Verata's Fiend and whatnot. Kill off all of the minions you find,
and you'll
eventually find Verata. DO NOT KILL HIM. If you do, you fail your quest, despite what the quest dialogue leads you to believe. Huh... apparently
he's
no longer a targetable enemy, so I guess you don't have to worry about killing him. Once he runs off, your quest is completed.
Ignore the path going left and move forwards, then keep going west. When you reach an open area, turn left and go all the way to the back to find the
refugees.
Speak to Elsa, then lead them back to Yak's Bend (don't map there, you have to walk these guys to the city). Just go back the way you came.
The refugees
will help you fight if any enemies get within aggro range of them. Also, Elsa is the only refugee that must survive. About 10 feet from the
entrance
to Yak's Bend, you get a quest updated message. Head inside, grab your quest rewards, then head back out again. Talk to Elsa again for a new
quest, then
head down the road and take a right, then take a left when the path splits again. A bit further south are the mobs I mentioned for those two
quests you
may or may not want to do together (I'm writing this like as if we're doing both. If you didn't, you'll just have to come back this way again
when you do
the one you didn't do now). Head right again for more mobs and a boss. Take another right to find... centaurs? ^O__o^;; Keep heading west
through the
centaurs. Here I want to make a slight note. You'll now start seeing "enemies" called Spirit of _____. In this area, you get Spirit of Winter.
Spirits
in Prophecies tend not to matter so much (in Factions, most of them attack, but those are ritualist spirits, whereas Prophecies only has ranger
spirits).
Basically what they do is influence a rather large area of the environment around them. Spirit of Winter, for instance, turns all elemental
damage to cold
damage (so even if you use fire magic, you'll be doing cold damage, even if you use a skill like Immolate which sets things on fire. This
only matters
with enemies that are weak or strong vs certain elemental damage). Soooooooooo... the point of this note is that spirits in Prophecies shouldn't
be priority
targets for you. Or even bother attacking at all, generally speaking. Anyway. Take yet another right and go through the portal to reach
Borlis Pass.
Grab your reward from Beccum Reedly, then get out of here, cause we've got other stuff to do first. Yes, I know this is a mission outpost.
We're gonna
finish the quests we got first. If you really just wanna do the mission (you can map teleport back later to finish quests), skip down to the
Borlis Pass
section below. If not, map back to Yak's for your reward from Osric for The Road to Borlis Pass.
Head back out the door and go south to that portal you passed on the way to the refugees/stragglers, but go through it this time (you'll see two signs near
it, one for Borlis Pass and one for the Ascalon Foothills). Follow the path in this new area until enemies appear on your radar. Here, take a left. Your
priority targets around here are Hydras first of all, and Stone Furies second. Stone Furies can cause blindness, but Hydras drop rocks onto your head using
the spell Meteor, and are all around not your best friends ever. Keep going left, cross a bridge, and the missing artisan will be hiding by a statue of
Grenth on your left. Talk to him for your reward, then turn around and go a bit east to find Oswalt's Headstone. Click on it to write Elsa's words on it,
then talk to Oswalt's ghost for your reward. Map back to Yak's Bend, empty out any rubbish from your inventory, and head back outside.
Go down the path and take a right. Once you reach where the path splits, stick to the left to find the first patrol point. Continue
onwards and hang a right, then another right up an incline to find the second patrol point. Turn back around and head straight east (not back the way you
came), stick to the right side and you'll find the third point a little past the portal to the Ascalon Foothills. Head back to Yak's Bend to get your
reward
and new skills from Van and sell any crap you got. Alright, time to do that Helping the Dwarves quest, that monk quest we got from Van
(The Wayward Monk), and a ranger quest, so make sure you've got plenty of room in your pack (in case you missed the various hints
about getting rid of rubbish). Head outside (Monks, Cynn will be in front of the res shrine to your left. Talk to her and she'll start
following you. If you have to map out for any reason, Cynn will no longer be at the shrine when you go back into Traveler's Vale. If you want her back,
just go back to town, abandon the quest, and re-aquire the quest from Van) and go south down the path, then take a right, then another right in the
large area with various exits. Continue north-ish, and be careful of the mob on the hill to your left. Make sure to aggro them first before anything else.
From there, go northwest and you'll see a large sloping hill in the distance. Head that way. If you're a ranger, you'll want to get up
that hill as quickly as possible, because your old trainer Artemis is on the other side of the bridge up there and is almost always under attack by the
time you get there. Make sure you HEAL HER, because if she dies you won't be able to get her quest. Once you get up the hill and across the bridge
go left and talk to Rangil Ironbow near the res point. Get your reward and next quest from him, then head through the portal just beyond him.
Talk to Cynn again (she's behind you) for her to keep following you. If Artemis died before you got to her, you
can
rezone into Traveler's Vale from here and try again, as it is closer and this increases the chances of you aggroing the enemies before Artemis does.
If
you happen to be both a ranger and a monk, Cynn should still be waiting for you in Iron Horse Mine when you zone back in there. Go right
and Mhenlo is just ahead. Cynn bites his head off, but talk to Mhenlo for your quest reward and new skills. Be aware that a patrol is
making its way towards you. Continue northwest and soon you'll come across the boss Artemis wants you to kill. Kill him, but don't
go back to her yet cause we've got other stuff to do here. Enter the cave to the north and you'll find Minaar not too far inside to the north.
Head back to Rangil for your reward and a new quest (and your reward from Artemis, if you're a ranger, then head back into Iron
Horse
Mine (you're gonna be sick of this place pretty soon, lemme tellya). Make your way back to that cave in which you found Minaar. From where he was,
head
left and follow this path out of the cave. Keep following the path, and keep going straight when it splits. The boss(es? There's always two here)
you need
to kill is/are just up ahead. You really only have to kill the dude on the insanity elephant, but you'll probably end up aggroing everything
else here as
well, so whatever. Once he's dead, grab the plans and run back to Rangil (don't map anywhere, cause you'll have to come back in here again
soon enough).
Give Rangil the plans, get your reward, grab the next quest, and go back into Iron Horse Mine. This time... head left! Yay, new directions!
... blah.
Anyway. The rest of the path is kinda hidden, but it's to your left. Keep following the path around. Eventually you'll come out into a more
open area.
Head right and kill anything near the levers around here. Keep going north, ignore your starburst for now, and continue northeast til you find
the keg
station. Might as well get rid of that mob you passed on your left as well, cause you'll need to return to the keg station at least three times.
Grab a
keg and head to your starburst. Try to drop the keg where it will destroy all three levers in this group at once (if your starburst doesn't change,
you'll
need another barrel for this group). Grab another barrel and head to the next group of levers. Again, if your starburst doesn't move, go get another
barrel.
Return to Rangil to be done with this incredibly long quest chain. Woo, done with Yak's Bend quests! Now, go do your mission! *shoos you back to
Borlis
Pass*


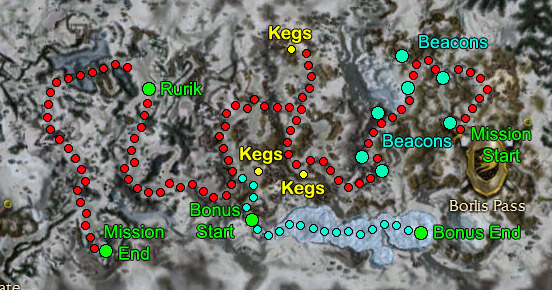
Mission map. Let someone who doesn't need his weapons to fight grab the torch, as the torchbearer doesn't attract all aggro
anymore (they changed it). As in previous missions, I recommend the person designated to carry bundles of any sort to be elementalists, because of their
primary attribute Energy Storage making it so that they don't really need the energy bonus from their weapon sets. Check the map for the beacon locations,
as not all of them are obvious from the road. Once you light the last beacon, don't just drop the torch. Go talk to Tolis over to your right so he will
take the torch (if you don't give him the torch, he won't let you continue the mission. I guess torches are expensive? ). Just so you know, the person
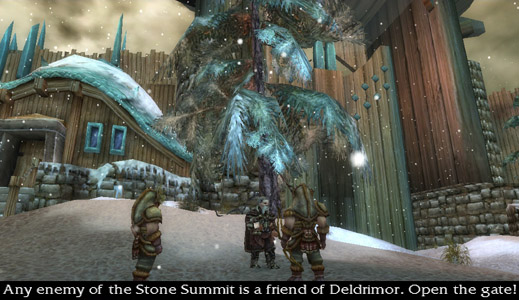
holding the torch needs to talk to Tolis to give him the torch, cause he won't take it otherwise. The gate now opens.
Once inside, stick to the left and go down into the ravine there. After the fight, you'll notice a Dwarven Powder Keg Station behind you. Let your
designated bundle-carrier grab a keg. Follow the map and you'll eventually reach a boss, behind whom is a locked gate. Drop the powder keg in front of
the door
(don't worry, it won't hurt you when it blows up), then go on through. Be careful right here, as just to your right is a hidden area that has a
mob or two
of Stone Summit. Make sure you take them out before aggroing much of anything else in this area. Kill the dwarves manning the catapults on the
other side
of this area for a morale boost per catapult you destroy, then head left. Kill everything in a straight line forward, then backtrack a bit to
find another
Powder Keg Station near a poor chained-up yak. :o( And no, you can't free him, sorry. If you don't want to do the bonus, hold down the left
Alt key and
look for a lever. Pull it to open the gate (nope, don't need a keg for this gate) and then skip the next paragraph.
Grab two kegs at the keg station (two different people, obviously, and it doesn't matter who carries them now as you won't be fighting before you have to
put them down unless you didn't kill everything straight to the end of this area like I just told you to), then find the right-most locked gate (the other
one is empty). If you hold down Alt, you'll see Rornak Stonesledge's name behind the door. Drop one keg at the gate to blow it open, talk to Rornak, then
the next keg drop is a bit tricky. You have to walk into the snow, and a bit to the right, then drop it to cause a small avalanche that opens up
the way. This may take a couple of tries, although you do have an unlimited supply of powder kegs. Once inside, BE CAREFUL, as the dryders here can cause
massive degen. Heal completely after every battle, or else you'll probably end up dead. Also, give your healer time to regen energy after each battle, as
these monsters in here take a real toll on healer energy and a healer without energy means a dead party. When you get to the boss, pull the dryders away
from him and kill them first. Regen if you need to, then unleash your fury on the drake. Bonus, completed! Backtrack to the powder keg station, then look
left to find another gate. Hold down the left Alt key to see a lever, and pull it (nope, don't need a keg for this one).
Follow the path til you get to a large open area packed to the brim with enemies. I seriously recommend pulling one group at a time, then kill the Stone
Summit Engineers. After they're dead, concentrate on the groups closer to the gate. Once everything out here is dead, the gate should open. Sometimes
very rarely there's a glitch here where the gate just won't open for whatever reason. If this happens, you'll have to start the mission over. Sorry.
Go
through the gate and speak to Rurik, who has somehow found his way here before you (oh my gods, Rurik can FLY!!). ^O__o^;; Anyway, he tells you to talk
to
King Jalis, who hands you... another torch. You know who to give it to by now. Go through the next gate, and now you'll have some help from a couple
of
allied dwarven NPC's. Don't get too used to them, though, as they're not exactly invincible. If you're really struggling, just stay with the dwarven
NPC's,
even if they walk really slowly. You'll eventually come upon a boss. After he and his mob are dead, all you've got standing between you and the
end of the
mission are three Stone Summit Beast Riders. Well, go kill them already! It'll make things easier for you if you just aggro one at a time.
Once all three
are dead light the three torches to trigger the ending cinematic (sometimes it takes about a minute for the game to register that you've lit
them all, so
be patient). ... this mission talks about alcohol entirely too much. All the drinking Rurik seems to be eager to do tonight might explain
why the next
mission ends the way it does...
Corpsicle Alert!
There's Something Looming on the Horizon
Everything Went [BOOM]
Of Princes and Kings and Banishings

