
Quests: A Brother's Fury (primary), Eye For Profit, Mysterious Message, Wisdom of the Druids, The Price of Steel
Skills: Air Attunement (Eye For Profit, ele), Hex Breaker (Eye For Profit, mesmer), Smite Hex (Eye For Profit, monk), Dark Bond (Eye For
Profit, necro), Antidote Signet (Eye For Profit, ranger), Axe Rake (Eye For Profit, war);
Stone Daggers (Mysterious Message, ele), Ethereal Burden (Mysterious Message, mesmer), Healing Seed (Mysterious Message, monk), Well of Suffering
(Mysterious Message, necro), Storm Chaser (Mysterious Message, ranger), Pure Strike (Mysterious Message, war);
Talk to Trader Versai for two quests (including your primary), then talk to Envoy Ero near the portal for another quest. Now, there's one more quest in
this town, but it's slightly hidden. Remember that Family Ties quest we got waaaay back when at Sardelac? Well, acquiring this quest is the same as that
one: If you look to the right of Trader Versai you'll see an incline. Go up that to find a shrine to Dwayna. If your server has favour, the statue will
be erect and have a blue light running through it (if you don't have favour, you can't get this quest, so come back later if you don't have favour). Kneel
in front of this statue to make the Avatar of Dwayna appear. She'll give you a quest that is supposed to teach you patience (trust me, it will). Alright,
well, Mr. Trader Dude over there is also the local merchant, in case you were wondering.
Head outside to hear some White Mantle people having an argument about... houseplants. K... well, talk to the very angry person to update your primary.
By the way, there are a lot of random devourer popups around here, so keep that in mind. Head just a bit north to find another NPC involved in your primary.
After you talk to him, though, continue north (the right path, not the left one) then take a right when the path splits. Follow this same path til you
reach a blue-green area. The NPC you want for Eye For Profit is right at the water's edge. Be careful of the Wind Riders that are all over the jungle,
as they love to spam Conjure Phantasm (massive HP degen) and interrupts. Make your way back to that last NPC we talked to and take the other path. You'll
see your next primary NPC in the distance. Talk to him, then take a right to go on the upper path (not the one that borders the blue-green area on your
compass) and follow this path across a tree bridge. If there are any enemies under the bridge, just run across it cause the only way to kill them is by
using non-line-of-sight spells and that gets pretty annoying rather quickly. Talk to Rionel on the other side of the bridge then head right, left, then
follow the path almost directly north (lots of poisonous spider popups and blood-sucking scarab pops around here, by the way) til Saidra shows up on your
party list. You'll eventually see her just to the west on your compass. Head that way, or just click on her name in your party list to follow her. The
kidnapped Chosen will soon show up there as well. You'll soon go through a portal into The Wilds. This is your next mission outpost, but we're going to
get those other quests out of the way first.
Grab your primary quest reward while you're here, then head back outside. We'll do the longer, more annoying one first. Once the path opens up head right,
then right again (tonssss of spidersss) down a narrow tree-lined path. Make another right when the path splits, then take the second left and go through
the nearby portal. Go left, kill off the disease-inducing jungle skale, then wait for a minute. Here, you've got two choices. See, a giant mob of wind
riders will approach you from the right once you move past where the skales were. And by giant, I mean h00j giant mob of DOOM. BUT! If you stay out of
aggro range and let them pass, you can go right without having to deal with them (you can probably kill the other two skales on the right before the wind
riders show up if you're quick enough). Right where the second group of skale are/were is the hollow log you need to toss the message into, so click on
the log to do that, then take an immediate left to border the lake (go through the water, not the path that is only land where more skales are). After the
last of the large puddles you'll see more skales on your right. Go towards them and follow this path they're on through the portal at the end into Silverwood.
Follow the path, then take the first left (it's kinda hidden, but you'll see it on your compass). Priority centaur targets here: Maguuma Protectors.
Continue west-ish when the path splits and head down into the water. Better hurry here cause most of the time the NPC you need is under attack by wind
riders, and if she dies well... no quest reward for you. Talk to her to get your new skills and a new quest, then map back to The Wilds.
Yeah yeah, Alari's quest appears to be nearby, but trust me, it'll be a lot easier if you just leave it be for now. Alright, from The Wilds head back out
into Sage Lands and head east this time. When you get to a turn in the path, you can theoretically avoid the mob of wind riders and their boss friend by
sticking to the left wall of this area, but there are a ton of spiders around here too. There are also more spiders on the ledge overlooking the path going
down so you might wanna clear out the ledge before you start heading down. The rest of the path down is also infested with spiders, lalala... Once you reach
the water you'll see the wind rider boss you need to kill for Eye For Profit just a bit southeast of you. Go on and kill him, but be aware that the other
quest you've got (Wisdom of the Druids) will spawn wave after wave of spiders once you approach the water. Grab the Lilac Eye the wind rider boss drops,
then take care of the waves of spiders. After about the fourth wave, a group of "Spirit of the Druid"'s will spawn at the water's edge behind you. Sit
around and wait for them to finish waxing metaphysical (this is where that patience thing the Avatar of Dwayna was talking about comes into play), then
talk to the Ancient Druid Spirit (the one druid whose name is different than the others) for your EXP. Map back to Druid's Overlook to get your new skills
from Trader Versai (who seems a bit annoyed that Graham didn't die) then go do your The Wilds co-op.


Map here. Go towards the White Mantle knights, who comment that the Shining Blade went this way. After you enter into a large
open area, ditch the White Mantle if you want the bonus. They'll probably die soon anyway. If you don't want to do the bonus, skip the next paragraph.
Take the left path and follow the cyan dots until you come upon a large log over your head. Stop there. If you hold down the left Ctrl button you should
be able to see two centaurs up ahead. Have ONE PERSON edge towards them, slowly, and have them STOP when the centaurs start talking. Do not
aggro the centaurs until they are absolutely done with their dialogue (when the centaur on the right says "I will guard Ramtha Brokenhoof and Horm Frostrider
with my life."). Now kill them both and someone needs to pick up the Vine Seed left on the ground. I hate this thing. Whenever you drop it, it grows a
miniature tree and you can't pick it up again for like 45 seconds. If you've got an elementalist in your party, have them carry the seed since elementalists
have Energy Storage as an attribute and thus the fact that bundles (i.e., things you carry like this seed and the torches and kegs in the Shiverpeaks
missions) nullify all of your weapon effects while you carry them (i.e., focuses you have equipped no longer give you more energy, etc.) will not affect
them, energy-wise. If you'll note on the map, the cyan lines now circle back to the large open area. If you have a minion master in your party you should
go this way so that you'll have enough minions when continuing the mission. If not, just go back the way you came to return to the large open area where
you left the White Mantle dudes.
Take the middle path. If the White Mantle knights are still alive, they'll be around here somewhere. After a bit, you'll trigger a cutscene, after which
you'll end up in a much larger open area, which has mostly blue ground. Kill off the centaurs in front of you and stick to the right side of this area
(yes, I am aware that the Shining Blade are over on your left, ignore them). Go up the hill further on. Now, if you're not doing the bonus, skip down to
the next paragraph. Follow the cyan dots to a glowing circle on the ground flanked by two miniature trees (you'll recognise this glowing circle from the
cinematic you just watched). As in the cinematic, drop the seed you should still have on the glowing circle. This causes a vine bridge to grow. Cross it
and head right, down the incline. I suggest not going all the way down quickly, but to pull each group of enemies towards you one at a time. Not only
will this prevent you from being mobbed at the bottom, but the fact that you are higher up than the enemies gives long-ranged attackers in your party an
advantage. At this point you'll again have a choice of paths. There are lots of centaur bosses down here, so if you need the morale boost go ahead and
kill them all, but the bosses you want for the bonus (Horm Frostrider and Ramtha Brokenhoof) are in the middle path. Be careful, as they are both elementalists.
Once they are dead, the bonus is complete and you can backtrack over the vine bridge you created earlier to continue the mission (follow the cyan dots to
where they meet back up with the red ones).
You shortly come across the vine bridge the Shining Blade scout created in the cinematic. Cross it, and here the paths get slightly confusing. Just follow
the red dots on the map to reach the water, at which point you should stick to the right wall instead of actually going down into the water. Soon you
should see a Maguuma spider if you hold down Ctrl. This spider is actually unwittingly showing you the way, as the path he's on is kinda not all that
obvious. You should enter this path instead of continuing straight ahead. Just be careful and move kinda slowly because more spiders drop down from the
trees than the ones already on the path, and they all have Apply Poison. It's best to make sure you're all healed and no longer poisoned after each group
of spiders, before continuing on. After a lot of spider-killing, you'll come back onto green land instead of the weird blue, and shortly after that you'll
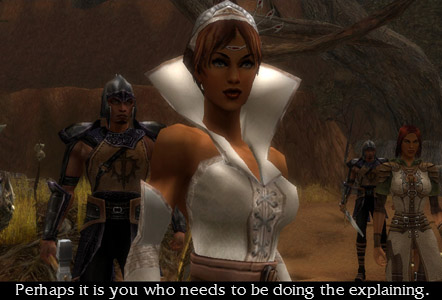
trigger another cutscene. Oh no! Spiders are trying to make lunch out of The Chosen! Some random chick beseeches you to help save them. Well, go on then!
Kill off the bazillion spiders that show up here, and the boss, to end the mission. Seems like that chick is the leader here, and your mouthing off to
her almost gets you run through instead. Seems like she's willing to give you a chance, though...
The Shining Blade's Labyrinth
There's Something Looming on the Horizon
Everything Went [BOOM]
Of Princes and Kings and Banishings
I've Got Snow in My Boots
Corpsicle Alert!
From Snow to Sand in 2.5 Seconds
Of Lions and Lambs
White Mantle, Coast to Coast

